
An area used for recording sound must be reasonably quiet with some degree of sound isolation. However, the amount of background noise that can be accepted depends on the kind of studio. For example, a pop music studio doesn’t need such a quiet background as a drama studio.
The following table shows the normal levels of background noise, measured in dB above the threshold of hearing, for common types of studios:-
| Type | 100 | 200 | 1 | 5 |
|---|---|---|---|---|
| General- | 50 | 43 | 28 | 19 |
| Speech | 44 | 36 | 23 | 15 |
| Drama | 40 | 32 | 19 | 12 |
Studio designers often use a special chart that defines a studio’s noise criteria (NC). For example, an area meeting the NC65 standard has a background noise of less than 65 dB at 4 kHz, although this can rise to 80 dB at 63 Hz. At the other end of the scale, a studio conforming to the NC15 standard has less than 15 dB of noise, increasing to as much as 47 dB at 63 Hz.
A good studio should meet NC15 or NC25. Unfortunately, commercial air-conditioning equipment often increases the figure to NR40, whilst the ventilation systems employed in offices can even reach NR60.
Most of the background noise in a studio, apart from that produced by air-conditioning equipment or other technical devices, originates from outside the building. The amount of noise that gets into the studio is dependent on the solidity of its structure. In other words, a studio’s sound isolation increases in proportion to the total mass of the material around it. The latter is usually measured in kilogrammes per square metre (kg/m2) of the material’s surface area.
The following table shows the relationship between isolation and total mass:-
| Isolation (dB) • | Mass (kg/m2) + |
|---|---|
| 17 | 1.2 |
| 20 | 2.4 |
| 22 | 4.9 |
| 25 | 9.8 |
| 27 | 14.7 |
| 30 | 24.4 |
| 34 | 48.8 |
| 37 | 97.7 |
| 41 | 146 |
| 43 | 195 |
| 44 | 244 |
| 50 | 488 |
| 56 | 976 |
• Average isolation value over the range 100 - 3200 Hz
+ Total mass measured as mass per unit area
The following table gives approximate total masses for different kinds of materials used in studio construction. The values for mass are given in kg/m2 per mm thickness of material.
| Material | Mass (kg/ |
|---|---|
| Aluminium | 2.80 |
| Asphalt flooring | 1.95 |
| Asphalt roofing - two | 2.23 |
| Block board | 0.46 |
| Block work | 1.37 |
| Block work | 1.59 |
| Block work | 2.15 |
| Block work | 1.11 |
| Block work | 0.77 |
| Brickwork - clay low | 2.00 |
| Brickwork | 2.15 |
| Brickwork - clay high | 2.33 |
| Chipboard | 0.77 |
| Concrete - natural | 2.31 |
| Copper | 8.86 |
| Cork | 0.17 |
| Cork | 0.29 |
| Fibreboard insulation | 0.27 |
| Hollow clay floor | 1.27 |
| Hollow concrete | 1.59 |
| Glass | 2.56 |
| Hardboard | 1.06 |
| Lead sheet | 11.40 |
| Plaster - two coats of | 1.73 |
| Plasterboard - solid core | 0.88 |
| Plywood | 0.60 |
| Sand | 1.62 |
| Steel | 7.72 |
| Water | 1.00 |
| Wood floor - hardwood | 0.73 |
| Wood wool slabs | 0.51 |
| Wood wool slabs | 0.56 |
As you can see, lead is an excellent material for the job, although expensive. Even so, it’s used in the sandwich-construction of a lead-lined studio door. Unfortunately, although very effective, this kind of door is also exceptionally heavy and usually requires specialist fixing.
For every extra 5 dB of sound isolation that’s required, the mass of a wall structure must be doubled. The following table gives approximate details for different types of fully-sealed walls:-
| Wall Type and Thickness | Isolation (dB) | Mass |
|---|---|---|
| 50 mm stud | 25 | 10 |
| As | 30 | 20 |
| 50 mm | 35 | 50 |
| 50 mm | 35 | 50 |
| 75 mm | 40 | 120 |
| Double | 40 | 120 |
| 112 mm | 45 | 250 |
| 224 mm | 50 | 450 |
| Double 112 mm | 50 | 450 |
| 450 mm | 55 | 1000 |
| 380 mm (15 in) | 55 | 1000 |
| Double 224 mm | 55 | 1000 |
• Coated with 12 mm of plaster
* Coated with 12 mm of plaster on both sides
A Camden partition, consisting of a timber framework faced with one or two layers of plasterboard on both sides, can also be used an acoustic barrier. This kind of construction can also be attached to a structural wall, forming a ‘skin’ that improves acoustic isolation. For the latter, you’ll need a timber-frame ‘grid’, consisting of battens 76 mm by 50 mm, fitted to the main wall, with vertical battens spaced at 0.6 m and horizontal ones at 1.2 m. Any ends of the battens that are attached to the building’s structure should be ‘sealed’ by means of mastic. They should also be ‘bedded in’ to the wall, again using mastic. Next, a 25 mm thickness of rockwool should be inserted between the battens and a layer of 12.5 mm fibreboard nailed on top. Finally, a layer of 12.5 mm plasterboard should be fitted, taking care to overlap the joints with those in the fibreboard, finishing with a fine ‘skim’ of plaster. The total thickness added to the original wall will be about 110 mm.
In a perfect recording studio there aren’t any reflections of sound, so the studio itself doesn’t influence the quality of a recording. Indeed, the perfect place to make a recording is in the open air, where sounds are evenly absorbed into the air at all frequencies. Unfortunately, in the modern world, it’s virtually impossible to find a quiet outside place for recording.
When a sound wave meets a solid surface, some of the energy in the wave is absorbed into the surface, either passing through the material or changing into heat. However, the remainder of the sound is reflected back into the air. Such reflections are inevitable and occur when:-
The latter effect causes low frequencies to pass through a surface, an effect known as diffraction. However, at high frequencies, most sounds are reflected, sometimes creating a sound shadow behind an object. Because of this effect, a square panel of around 300 mm by 300 mm (roughly corresponding to the wavelength of a sound at 1 kHz) reflects hardly any sounds waves below 1 kHz, half the waves at 1 kHz and almost all the waves above 1 kHz.
When a sound passes through an aperture whose size is less than the wavelength of the sound, the ‘fronts’ of the normally flat sound waves become curved. If the aperture is larger, or the frequency higher, the wave fronts are unchanged. Some types of loudspeaker exploit this effect to obtain a directional characteristic.
Any studio with numerous reflective surfaces is said to be lively: when a sound has actually stopped the reflections can still be heard, but then gradually fade away. This phenomena, known as reverberation, is measured by the time taken for a sound to ‘die away’ to a specified level.
The most common way of measuring reverberation time is known as RT60, which is defined as the time taken for a sound to fall to 60 dB below its original intensity. You can calculate the theoretical RT60 for a studio using the following equation:-
where
RT60 = reverberation time
V = volume of studio
S = total surface area of
A = average sound absorption
The total sound absorption, which is S × A, can be obtained using the following equation:-
where
s1, s2 … = surface area for
a1, a2 … = absorption
The sound absorption coefficient for any material is measured in sabines, defined as:-
All of the above equations are only accurate when the average sound absorption coefficient is less than 25%, although they can still be used for estimates. For precise calculations, the absorption of air may need to be considered, in which case you’ll need to use this more accurate equation for reverberation time:-
Ideally, your value of RT60 should give a natural atmosphere and be suited to the kind of recordings that you intend to make in the studio. The actual or optimum RT60 figures for different environments or recording areas are as follows:-
| Environment | RT60 | Volume |
|---|---|---|
| Open | very | - |
| Average | 0.5 | 12 |
| Drama | 0.15 | - |
| Pop | 0.3 | - |
| Radio | 0.3 | 30 |
| Radio | 0.6 | 250 |
| Television | 0.6 | 3,000 |
| Drama | 1.2 | - |
| Music | 0.8 | 700 |
| Theatre | 1.0 | - |
| Concert | 1.5 | 15,000 |
| Large | 10 | - |
A studio’s RT60 should:-
The mean free path (MFP) for any wave front is given by:-
where
V = volume of studio
S = total surface area of
The number of reflections (NR) within the time RT60 is given by:-
where
For a natural reverberant sound there should be at least 100 reflections within an RT60 of 0.25 seconds. In a small studio of 5 m by 4 m by 3 m the calculated NR is 33.67. This means that such a small studio can’t provide ideal listening conditions, which can also be proven in practice.
Absorption coefficients for materials at different frequencies are given in the following table:-
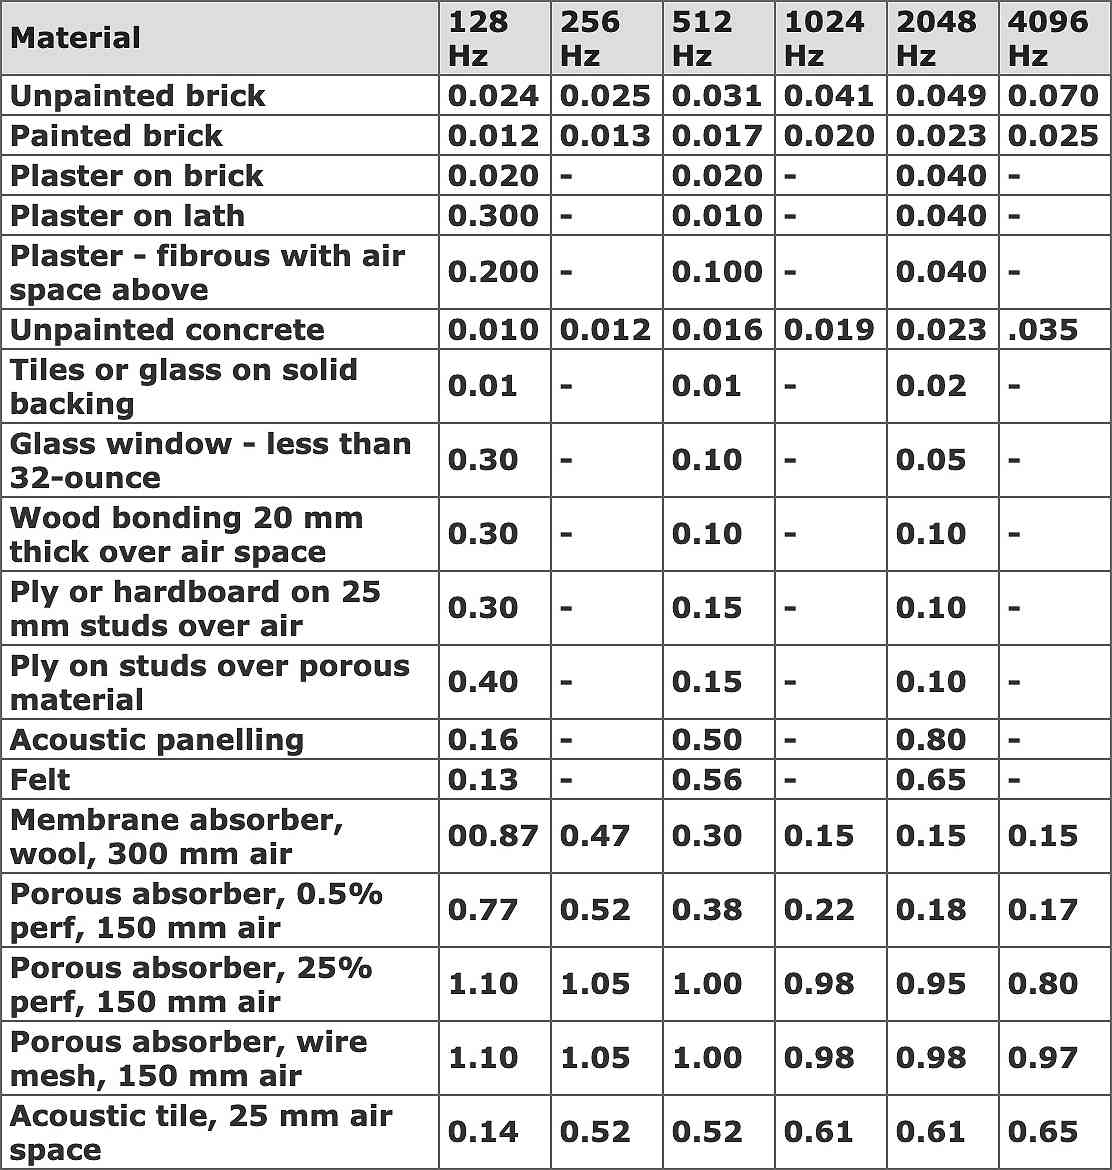
Due to the effects of diffraction, some absorbers seem to have a coefficient that’s greater than unity. In practice, a lower coefficient is obtained when several absorbers are used together.
Typical studio furnishings, together with people, give the following figures:-

Each time a sound is reflected from an absorbent material the sound energy is reduced. The amount of attenuation provided by materials of different coefficients is shown in the next table:-
| Coefficient (A) | Attenuation (dB) |
|---|---|
| 0.5 | 3.00 |
| 0.6 | 4.00 |
| 0.7 | 5.10 |
| 0.8 | 7.00 |
| 0.9 | 10.00 |
An absorber reflecting just 1% of energy will reduce the sound level by
corresponding to an attenuation of 20 dB.
Materials such as wooden floors and plasterboard provide a high coefficient due to a natural mechanical resonance. Unfortunately such resonance is tuned with a high quality (Q), which means that the absorption is often only effective over a narrow frequency band. However, by introducing numerous different resonant frequencies they can be used to advantage. For example, you can randomise the spacings between the backing studs in partitions or wall treatments. It’s also worth noting the dramatic effect that soft furnishings and people can make to the average coefficient.
The reverberation time of your studio can be modified by using acoustic absorbers on its walls and ceilings. These may also be used to reduce resonance, although excessive absorption can reduce a studio’s RT60 figure to an unacceptably small value. Common types of absorber include:-
This consists of a layer of porous material, such as glass wool, synthetic wadding or rockwool. A passage of air must be allowed through the absorber, making cellular materials, such as expanded polystyrene, unsuitable for this application.
The thickness should equal at least a quarter wavelength of the sound to be absorbed. For practical reasons, this means that this kind of absorber can only be used for frequencies that are above 200 Hz. Typically, a 25 mm thickness of material is used in front of a similar depth of air space.
A hardboard cover with 0.5% perforations makes the coefficient fall at frequencies above 250 Hz, whilst 5% perforations gives a ‘peak’ coefficient of 1.2 at 600 Hz, again falling at higher frequencies. Without a cover, it’s possible to get a coefficient of 0.1 at frequencies above 1 kHz.
This consists of a flexible membrane placed in front of a sealed air space, creating a resonant device. However, this resonance is damped, ensuring absorption at all frequencies close to resonance. Membranes can consist of one or two layers of roofing felt, wood panelling, hardboard bonded with bituminous roofing felt or other materials. Typical absorption coefficients are given below:-
| Frequency | 150 mm | 75 mm |
|---|---|---|
| 100 | 0.8 | 0.5 |
| 125 | 0.4 | 0.85 |
| 250 | 0.3 | 0.4 |
| 315 and above | 0.2 | 0.2 |
This is a hollow box with a neck that resonates as the mass of air in the neck ‘bounces’ against the air in the box. With damping, this device can absorb sound near its resonant frequency. This kind of absorber is particularly suitable for solving problems that can’t be fixed by any other means.
This often consists of 150 mm by 150 mm hardboard partitions, facing outwards and attached to a brick wall, covered with a layer of chicken wire, followed by 25 mm of rockwool and perforated hardboard. The coefficient is substantially flat, giving a figure of 0.8 above 125 Hz and 0.6 at 63 Hz. Using 300 or 600 mm partitions changes the latter to 0.5 or 0.4 respectively.
These are similar in construction to a wideband or membrane absorber, but in the form of a box, often 580 mm square and 200 mm deep, and favoured by the BBC. When fitted to battens the overall depth increases to 212 mm, although the space at the back of the boxes can usefully be used to accommodate technical wiring.
To improve the appearance, wooden battens should be placed around the edge of each ‘block’ of boxes. Technical boxes and cupboards can be of related dimensions, providing a modular style of studio construction. There’s usually little benefit in fixing the bottom of boxes lower than 650 mm from floor level.
The following diagrams show how acoustic boxes can be installed in a real studio, using alternate boxes with different amounts of perforations:-
In some instances, particularly where resonance is a problem (see below), boxes are better placed in groups of four or six, with an area of bare wall between them. However, such an exposed wall should always face another group of boxes on the other side of the studio. This technique uses the sides of the boxes to reflect sound, increasing the amount of diffusion (see below). Having said this, a full complement of boxes should always be used behind a studio’s monitoring loudspeakers.
If any dimension of a room corresponds to half the wavelength of a sound, a standing wave is created. This happens because the room is ‘tuned’ to the sound’s frequency and resonates with it.
Standing waves can cause pressure variations of 20 to 25 dB in different parts of a room. This has unfortunate effects on monitoring: sometimes certain sounds will be seem too loud, other too quiet.
Resonance also occurs at wavelengths that are multiples of the room’s dimensions. The frequencies that excite such resonance are at harmonics of the fundamental resonant frequency. Fortunately, the pressure variations produced by such harmonics are less serious, particularly at higher frequencies.
Resonance becomes more complicated when considering all of a room’s dimensions, including its diagonals. In fact, there are an infinite number of resonant mode frequencies, although those at higher frequencies aren’t so significant. Such resonant frequencies are set purely by the dimensions of a room, although it’s possible to reduce the intensity or quality (Q) of such resonances by installing extra furnishing, acoustic absorbers (see above) and other treatments.
Such resonances in a small studio can be especially disturbing. Thankfully, they occur at lower frequencies in a large studio, sometimes in a range almost outside the range of normal hearing.
This table shows the approximate resonances for a room 4.7 m long, 3.4 m wide and 2.5 m high:-
| Resonance | Freq | Due |
|---|---|---|
| 1 | 36.77 | Length (L) |
| 2 | 51.14 | Width (W) |
| 3 | 63.00 | L-W diagonal |
| 4 | 68.60 | Height (H) |
| 5 | 73.90 | 2 L |
| 6 | 77.85 | L-H diagonal |
| 7 | 85.57 | W-H diagonal |
| 8 | 89.70 | 2 (L+W) |
| 9 | 93.15 | L+W+H |
| 10 | 100.70 | 2 (L+H) |
For a studio of dimensions 3 m by 5 m by 7 m, the lowest resonant mode frequencies can be calculated using a series of equations, beginning with:-
f100 = (c/2) × (1/3) = 57.2
f010 = (c/2) × (1/5) = 34.3
f001 = (c/2) × (1/7) = 24.2
f200 = (c/2) × (2/3) = 114.4
f020 = (c/2) × (2/5) = 68.6
f002 = (c/2) × (2/7) = 49
and so on …
where
Resonance problems can be minimised by choosing ratios of room dimensions that spread the resonant frequencies over a wide range. Now, at low frequencies sound is radiated in the form of spherical waves, whilst at high frequencies it behaves more like light, obeying ray theory. The frequency at which this behaviour changes given by:-
where
c = velocity of sound
d = smallest room dimension
This indicates that the most crucial dimension in a studio is the ceiling height.
Some ideal ratios for room dimensions are given in the following table :-
| Room Size | Height | Width | Length |
|---|---|---|---|
| Small | 1.00 | 1.25 | 1.60 |
| Medium | 1.00 | 1.60 | 2.50 |
| Large | 1.00 | 1.25 | 3.20 |
The worst kind of problem is structural resonance, caused by elements of the building that are tuned to particular frequencies. This can be minimised by using techniques such as:-
One way to reduce resonance involves the introduction of irregular surfaces to ‘break up’ or disperse standing waves. To be effective, the depth any diffusing surface must be one seventh of the wavelength of the offending frequency. In complex areas, such as a television studio, diffusion may accidently be provided by sets, technical equipment and other hardware.
By using optimum diffusion you can minimise effects such as colouration, flutter-echo and ringing. To do this, you must ensure that the mean coefficient of absorption of any pair of the three parallel surfaces in a studio does not exceed the ratio 1:1:4. Ideally, the figure should be 1:1:1.
This technique works by providing almost complete absorption in the vicinity of the monitoring loudspeakers. At the other ‘technical end’ hard reflective surfaces are used, providing a more comfortable acoustic environment. In a larger studio the rear wall can also be angled to minimise resonance. Unfortunately, the latter refinement is ineffective in small studios.
Developments in Recording, Andy Munro, Studio Sound, October 1980
Interior Design, Norman Bone, Studio Sound, 1981
Control Room Acoustics, Andy Munro, Studio Sound, July 1982
©Ray White 2004.
