 Resources Resources
A resource is a Classic Mac OS software component that can be used by other programs to provide specific features. Resources come in various forms and are found inside many files, including applications, documents and other files that are used by the Mac OS or other programs.
The Classic Mac OS is highly structured, employing a set of managers that are kept in ROM, in the System file or as files in the System Folder. The most important of these are:-
| Manager | Area |
|---|---|
| Control | Dialogue |
| Dialog | Messages |
| Editions | Publish |
| Event | Mouse |
| File | Files |
| Font | QuickDraw |
| Menu | Pull-down |
| Notification | Messages |
| Printing | Printing |
| Process | Switching |
| QuickDraw | On-screen |
| Resource | Resources |
| Scrap | Scrap |
| Script | Global |
| Sound | Sound |
| Text | Text |
| Toolbox | Programming |
| Window | Screen |
The Toolbox Utilities, which are generally used by all applications, including the Finder, lets programmers implement a standard operation, such as the opening of a window, by means of a single call to the Toolbox. Although alternative code can be written from scratch, it’s a waste of time, effort, disk space and memory. What’s more, such non-standard code can upset other software.
Of the remaining managers, only the Resource Manager concerns us here, since this determines which resources are kept in RAM and how they’re to be used. Each resource contains one or more calls to the Toolbox. These resources can be modified, added or deleted by means of a resource editor such as ResEdit or Resourcerer. Special resources can be processed with alternative applications, such as BalloonWriter (APDA) that adds balloon help resources to a file.
Files used in the Classic Mac OS can have up to three parts: the data fork, corresponding to a normal file on a non-Macintosh computer, the resource fork and Finder information. When a file is manually transferred from a Mac to a non-Mac computer, only the data fork is carried across.
The resource fork is entirely separate to the data fork but has the same filename, while the Finder information is kept in a special file (or files) known as the Desktop file. To avoid confusion, the Mac OS presents all three elements to the user as if it were a single document.
The Resource Manager searches for resources required by an application in the following sequence:-
| Location | Example | |
|---|---|---|
| 1 | Current | Font |
| 2 | System | Font |
| 3 | Open | Font |
Each type of resource is identified by a four-character type code. For example, a simple bitmap font resource has a code of FONT. Note that some codes end with one or more spaces.
Each resource also has a unique ID number that ties it into the programmer’s code. In addition, some numbers are reserved: for example the custom icon on a file always has an ID of -16455. Resources that you create, apart from fonts, must use numbers from 128 to 32767.
The numbers are grouped as follows:-
Reserved by Apple. Using these numbers can cause problems with system compatibility.
For resources owned by another resource such as CDEF, DRVR, MDEF, PACK, PDEF or WDEF. You can check what owns a resource by selecting Get Resource Info from within ResEdit.
For resources inside a control panel file.
For system resources that are owned by another system resource. You can check what owns such a resource by selecting Get Resource Info from within ResEdit.
For system resources such as CDEF, DRVR, MDEF, PACK, PDEF or WDEF that own another system resource.
Reserved for system resources, including WDEF and CDEF resources.
Available to programmers. Non-system WDEF and CDEF resources are in the range 128 to 4095.
 Using the ResEdit Application
ResEdit employs specialised editors, templates or a hex editor that allow you to delete, modify or add to the resources that are contained in a file.
ResEdit displays each resource type in a file as an icon., as shown below:-
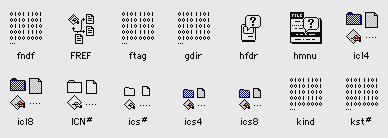
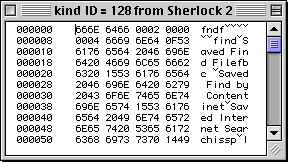
Double-clicking an icon reveals a list of the resources. If you open icl8 you’ll see something like this:-

You can then open one of these items to modify it. With the above example you’ll get:-
With some resources the list isn’t so exciting:-

Some resources can be edited by means of a template, similar to that shown below:-
whilst others require you to use the hex editor, which looks like this:-
Resources types that are identified by a ‘binary digits’ or ‘programming’ icon are usually presented the last way. However, you can also view other resources in the hex editor by pressing Option whilst opening any resource. This overrides any standard editor or template that may be available.
Here are some other aspects of the ResEdit application:-
If you select Get Info for or Get File/Folder Info you’ll see something this:-

in which you can modify the file attributes and other file parameters. Fortunately, the Finder Flags settings for Mac OS 7.x are also suitable for Mac OS 8.x or later.The remaining sections of this document examine some of the resources that you can encounter. Note that the abbreviation <space> has been used to represent a space in some resource codes.
 Font Resources
A font resource describes the shape of the characters used in a font or typeface. In the Classic Mac OS such resources often exist in applications or stand-alone documents, although they’re more commonly found in the following types of files:-
| File | File | Res | Resource |
|---|---|---|---|
| Post | LWFN | POST | Post |
| Font | FFIL | FOND | Font |
| Font | FFIL | FONT | 72 |
| Font | FFIL | NFNT | New |
| Font | FFIL | sfnt | Scalable |
FOND, FONT or NFNT resources can be usefully modified with ResEdit.Here’s some more information about these resources:-
 POST
POSTThis is a PostScript outline font resource, which is usually of the PostScript Type 1 variety. If a particular style of a POST font is missing the Mac modifies the plain font. For example, it creates boldface characters by adding 30% to the width or oblique by slanting to the right by 15°.
This kind of resource is normally kept in a file of its own. The Mac OS gets access to such files via a standard font suitcase. So, if a suitcase is missing the PostScript font is usually unavailable.
 FOND
FONDThis font family descriptor or directory locates up to four other resources that define the plain, bold, italic and bold italic styles for a font family. These can be FONT, NFNT or sfnt resources. The FOND also contains width adjustments for outline, shadow, condensed and extended styles.
If you select Get Resource Info in ResEdit you’ll see that each FOND has a font family name, as shown in all Font menus, and a family ID, which is the same as the number inside the FOND itself.
FOND whose family name begins with % doesn’t appear in Font menus. This is useful if a font is used for a barcode or where a font is used purely for on-screen presentations.FOND inside an application or document can begin with a space. This avoids confusion in the Font menu that might occur with a similar FOND resource in the Fonts folder.Inside a FOND resource itself you’ll see the Family ID (again), as well as a list of the other font resources that are used for each Font Size and Font Style.
To change the name of a font, as shown in Font menus, you should proceed as follows:-
NewName.NewName. If its name is locked, you can use a utility such as FileTyper to unlock it.FOND icon, select the FOND resource, choose Get Resource Info and then type NewName in the Name window. FONT
FONTThis outdated resource describes the shapes of the characters employed for one size of a bitmap font or typeface at 72 dpi. Early Macs used FONT resources both for printing and for screen display. Although still used on the Classic Mac OS screen, they’ve been replaced by TrueType or PostScript fonts for printing. The pixel editor in ResEdit can be used to design and modify each character in the character set: to move through the character values just drag the character box sideways.
Modern FONT resources are linked to a parent FOND that describes an entire font family and its styles. The FONT resources as supplied in a font suitcase must have a family ID of between 0 to 255, although 0 to 127 are reserved by Apple for their own fonts. Older suitcases also have a Size 0 FONT that acts as a reference for the fonts in a family. Its ID is given by:-
while other FONT resources have an ID given by:-
where the size of the font is measured in points. The Size 0 FONT usually has the same Name entry as the parent FOND. However, other FONT or NFNT resources shouldn’t be named, as this can cause double entries to appear in the Font menus of applications.
FONT resource stored in an application or document.FONT resources can get corrupted, especially under Mac OS 8.6. You can use an Apple fix for this problem or you can install the Font Fixer for 8.6 extension.Older fonts often have a separate FONT resource for each font style. For example, the Helvetica family can have Helvetica, B Helvetica Bold, I Helvetica Italic, and BI Helvetica Bold Italic resources. The names of such FONT resources use the following prefixes, often in combinations:-
| Style | Style | |||
|---|---|---|---|---|
| B | Bold | L | Light | |
| Bk | Book | N | Narrow | |
| Blk | Black | O | Oblique | |
| C | Condensed | P | Poster | |
| D | Demi | S | Semi | |
| E | Extended | Sl | Slanted | |
| H | Heavy | U | Ultra | |
| I | Italic | X | Extra | |
| K | Kursive |
With the Helvetica font you can get bold characters by selecting B Helvetica Bold from the Font menu or by selecting Bold in the Style menu. This arrangement is very messy, since every font and style appears in the Font menu. The practice still persists, however, in the case of PostScript fonts.
The suitcases described above lack FOND resources, which means you don’t see any characters when such a suitcase is opened in the Finder. You can add a FOND using ResEdit as follows:-
FOND resource from another suitcase that contains only one FONT.FOND resource and enter an ID equal to the family ID.FONT resource.FONT resources whose ID isn’t 0.FOND resource and enter the Family ID, as well as the Font Size, Font Style and Res ID for each of the corresponding FONT resources.This can be a tricky process. If you find that the font doesn’t appear correctly in all of its styles you should check that the FOND resource correctly refers to all of the related FONT resources.
Newer versions of the Mac OS store FONT resources for on-screen fonts, such as Geneva (9 and 12 point) and Monaco (9 point), in the System file. Note, however, that System 7 and earlier versions of the Mac OS employ a designated font for the system font, as used in menu items and dialogues. This standard font, known as Chicago, is kept in ROM on older machines. Fortunately, Mac OS 8 and later systems let you select other system fonts in the Appearance control panel (see sfn# below).
It’s possible to change the system font in older versions of the system, although this involves modifying your System file with ResEdit. To do this, open the file’s ROV# (ROM override) resource and select Insert New Field. Now enter FONT in the TYPE field and 12 in the RES ID field. Finally, you should add an alternative font with an ID of 12 to your Fonts folder.
 NFNT
NFNTThis New Font resource replaces the older FONT resource. When used for on-screen display it works in the same way as a FONT, employing separate resources for each font size. However, when used for printing, the resolution is improved by scaling down the largest available NFNT. For example, the Heidelberg font of this kind uses a 36-point NFNT resource to print characters of all sizes. Hence 36-point text is printed at 72 dpi while 12-point text is reproduced at 216 dpi. In practice, however, this feature has been overtaken by the arrival of TrueType and PostScript fonts.
An NFNT, unlike an original FONT, only shows one name in the Font menu for all sty;es. And font menus are faster, since information about the entire family is contained in a single FOND. Furthermore, the family ID of a FOND doesn’t have to be numerically related to the ID of each NFNT. In a suitcase you can use a family ID of 0 to 32767, although some numbers are reserved by Apple. Any conflicts of family IDs are resolved by the Mac OS, or by Font/DA Mover in old systems.
FONT resources into NFNT resources when you move them into a new suitcase.NFNT that’s modified using ResEdit’s pixel editor ends up at 72 dpi. So, for serious work on NFNT resources you must use a special editor.fctb resource can be used to add coloured characters to a NFNT. sfn#
sfn#This resource, which is kept in the System file, contains a list of approved system fonts, thereby preventing the user from selecting unsuitable fonts in the Appearance control panel.
Extra fonts can be added to the sfn# list as follows:-
sfn# resource using the STR# template in ResEdit.Tecton and the second 12.Having restarted your computer you should be able to select the font in the Appearance panel.
sfntA scalable font that gives accurate results at any size. It can contain a TrueType, TrueType GX or PostScript font, although there’s no way of knowing which of these is actually in the resource.
The following resources are used to create on-screen graphics. You’ll notice that two resources are shown in some of the entries: those with an uppercase name are used for a black and white images while those with lowercase names are used for colour.
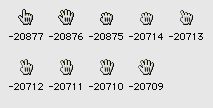
 acur
acurThis contains a list of CURS resources (see below) that create an animated cursor. Eight resources of this kind are provided in the System file to create the standard moving stopwatch.
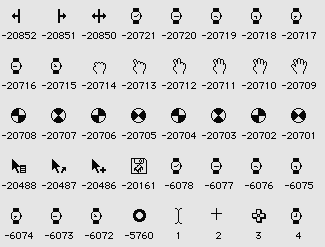
 CURS crsr
This is a 16 × 16 pixel cursor that’s used as a pointer. It consists of a picture, mask and hot spot, the last of which is the actual ‘point’, as shown by a small cross in ResEdit.
The CURS resources found in the System file are shown below:-
These are accompanied by the following crsr resources:-
 PAT<space> ppat
This block of 8 × 8 pixels can be linked to create patterns for scroll bars and other screen details.
 PAT# ppt#
Contains a list of patterns, each of 8 × 8 pixels, usually linked together to create shading on the screen. Each resource can contains any number of patterns.
The screen icons used for display in applications or in the Finder are as follows:-
 ICON
ICONThis contains a black and white icon of 32 × 32 pixels, as used in HyperCard. In the System file, the ICON resources 0, 1 and 2 are the warning hand, dialogue icon and warning triangle.
 SICN
SICNA set of small icons of 16 × 16 pixels, as used at the left-hand side of text windows. You can create a SICN by removing every other diagonal line in a standard icon, although the results aren’t always very pretty. Small icons automatically created from ICON resources in the Mac OS are even worse.
 cicn
cicnThis contains a colour icon of any size from 8 × 8 to 80 x 80 pixels, although usually 32 × 32. It also includes a black and white version of the icon and shadow mask. In ResEdit’s Colour menu you can choose from standard Apple Icon Colours, Standard 256 Colours and other sets.
 Desktop Icon Resources
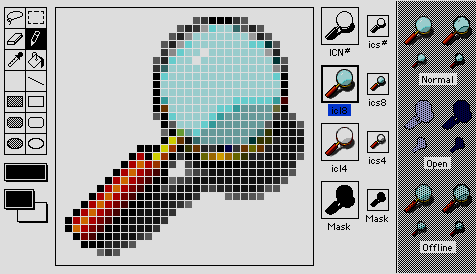
Desktop or Finder icons are used to represent items on the Desktop. They come in a wide variety of types and sizes. Fortunately, whenever you open any ‘classic’ icon resource in ResEdit you’ll be presented with the entire icon family, all which can be edited as required.
BNDL editor.128 where there is single family of icons, as employed to represent the file itself.ICN# can be copied onto an ics# by dragging the ICN# (in the small box on the right) onto the corresponding ics# box.The full range of icons are:-
| Res | Size | Colour | Colour |
|---|---|---|---|
| icns | See | 24-bit | 16.7 |
| ics4 | 16 | 4-bit | 16 |
| ics8 | 16 | 8-bit | 256 |
| icl4 | 32 | 4-bit | 16 |
| icl8 | 32 | 8-bit | 256 |
| ICN# | 32 | 2-bit | Black |
| ics# | 16 | 2-bit | Black |
where those ending in # (hash) originate from very first version of the Mac OS.
The icns resource, introduced with Mac OS 8.5, effectively replaces all of the previous icon resources, accommodating all the information found in the older resources within a single resource. It represents all the icon sizes, as well as 48-pixel icons and coloured icon masks (see below).
icns resources from within ResEdit.ICNS and filename extension of .icns, to store icns data. Unlike Classic files, the information is stored in the data fork, although some ICNS files also contain a traditional icns resource.An icon mask defines the area that’s clicked to select an item. If a mask is missing or blank you won’t be able select the icon and if you do manage to drag it your machine may crash.
To create a mask in ResEdit just drag an icon (in the small box on the right) onto the corresponding mask icon. The icl4 and icl8 icons are masked using extra ICN# resources, while the ics4 and ics8 icons are masked with using an extra ics# resource.
The icon for a hard disk drive can be kept as ICN# resources in a formatting application. During formatting, one resource is installed onto the drive in a different form. If you need a different icon, you can use ResEdit to modify one or more of the application’s ICN# resources prior to formatting.
The Mac OS incorporates a mechanism that lets the user replace all the usual file icons by alternatives of his or her own choosing. This is made possible by using an icon vault file, which contains a set of icons for files that have a specific creator code. When you next rebuild the desktop the Finder uses these icons in preference to those normally provided by the application. You can have as many vaults as you like, even for files of applications that aren’t on your machine.
A vault file has a type code of ICVT and a creator code of XXXî, where XXXX is the creator code of the appropriate application and î is a small letter i with a circumflex accent. This means that if you require special icons for your AppleWorks files you must employ a creator code of BOBî, since AppleWorks normally has a code of BOBO.
Creating a vault isn’t a trivial task as each file must contain:-
BNDL resources, each with an ID of 128 or higher. These must have a Signature of XXXX, matching the creator of the application, and a Type list of all the application’s files.BNDL resource with an ID of 128 or higher. This must have a Signature of XXXî and must include a Type entry for the ICVT type code.FREF resource with File Type entries for all the application’s files as well as the ICVT type.XXXX resource with a Name of Owner Resource, containing 00, as seen in the hex editor.XXXî resource with a Name of Owner Resource, containing 00, as seen in the hex editor.128 or higher. These should also appear in the BNDL editor window, which indicates that the icons are correctly linked to the FREF entries.STR<space> resource with an ID of -16397 and containing text such as:-Icon Vault
This file adds custom icons
Place it in the “Icon
vers resources with an ID of 1 and 2 respectively. These contain information for the icon vault file’s Get Info window, if required.The completed vault files must go in a folder named Icon Vaults: note that this name must begin with space. This folder should then be put in the System Folder and the filenames of both folder and vaults should be locked. Once you’ve installed a vault file you should rebuild the desktop.
The following resources are often encountered:-
alisThis resource, as found in the System file, acts in a similar way to a group of aliases, pointing to one or more disk drives. Once present, your machine may insist on you inserting a particular disk. The information contained in the alis may also be transferred into one or more preferences files. Fortunately, removing an alias resource from a System file seems to cause no ill effects.
alis resources into the System file. ALRT
ALRTSets the window size, screen position and title of an alert box, the kind of dialogue that normally generates an alert sound. An optional actb resource can be used to add colour.
Each ALRT is usually linked to a a DITL resource. The latter usually has the same ID and contains details about items in the dialogue. You can double-click on the ALRT window to reach the DITL, drag from the bottom right-hand corner to resize it or click and drag anywhere within it to move it.
If you select Set ALRT Stage Info in the ALRT menu you can choose what to do if the user keeps making the wrong responses. To get an alert sound without using disk access you should enable the Preload checkbox in the Get Resource Info window.
 BNDL
BNDLThis resource, which is usually found in an application file, ties various kinds of documents to the application by means of its creator code and recognised type codes. However, such recognition is only possible if the Has BNDL flag is enabled in the application file. You can check this using the Get File/Folder Info feature in ResEdit, as shown below:-

If you open the BNDL resource of an application in ResEdit you’ll see something similar to that shown below. This list shows the type code and icon for each file accepted by the application.

Any type code that begins with an s is a stationery file, as shown in these two examples:-
| Document | Normal | Stationery |
|---|---|---|
| Text file | TEXT | sEXT |
| Picture file | PICT | sICT |
Before drawing an icon, the Finder checks if the Stationery flag is enabled. If so, it replaces the first letter of the type code by s. The BNDL resource then uses this code to give it a stationery icon.
If you select Extended View in a BNDL window you’ll see an item called @ String. This field is often empty, since modern applications provide information about themselves in the vers (version) resources. Anything you do see in this field is provided by the signature resource, a special resource that has a resource type code that matches the creator code of the application.
 clut
clutThis contains a colour lookup table for colour routines. The System file has several of these resources, including clut 5 (4 bit for 16 shades) and clut 9 (8 bit for 256 shades).
The clut resources in older versions of the Appearance control panel can be modified if you don’t like the existing colour options. You can copy an existing clut, give it an ID of 219 and then edit to taste. The colours should be numbered from 0 to 7 with the existing item 8 as black.
CODEThis contains programming code for an application, usually in 680x0 form. A CODE with an ID of 0 is used to point to additional CODE resources in a file.
 DITL
DITLThis dialogue items list describes the content of a dialogue or alert windows. Its ID should be the same as the matching DLOG or ALRT resource. Items can be dragged into position or resized from the bottom right-hand corner, although resizing the window doesn’t have any effect on the resource.
The DITL menu in ResEdit has some useful features. For example, Show All Items reveals any items that are outside the boundaries of the window, Set Item Number is useful when creating a new application, Align to Grid positions items on an adjustable invisible grid and Use Item’s Rectangle restores a stretched ICON or PICT image to its normal shape.
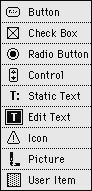
The following kinds of items can be found in a DITL window:-
1 for OK and 2 for Cancel. Pressing Return or Enter selects OK automatically. DLOG
DLOGThis sets window size, screen position and title of a dialogue box, which usually appears after you select an item ending in …. An optional dctb resource can be used to add colour to this kind of dialogue. However, if you open the latter you’ll find yourself back inside the related DLOG resource.
Details about the box’s contents are kept in a matching DITL (see above) whose ID is kept in the DLOG. In most cases, matching DLOG and DITL resources have the same ID. The DLOG window can be resized from the bottom right-hand corner or moved by clicking and dragging within it. If you double-click in the dialogue window you’ll open the matching DITL resource.
 finf
finfThis font information resource defines the font, font size and font style used in a program’s windows. It should use Apple reserved fonts for consistent results on any Mac, thereby ignoring peculiar fonts installed on a specific machine.
 FKEY
FKEYAlso known as function key, this is really a mini-application, which is usually launched by pressing ⌘-Shift and a specified number key, the actual number being set by the FKEY resource’s ID. An FKEY can be enabled by one of the following methods:-
FKEY resource to your System file. Note, however, that two resources, FKEY 3 and FKEY 4 are already built into this file. Extra FKEY resources can be added to the System by means of a suitable utility, although its best to work on a copy of your original file.FKEY file should have a type code of FFIL and a creator code of DMOV. This particular option works in several recent versions of the Classic Mac OS, including Mac OS 7.5.FKEY resource, it’s creator code should be RSED and its type code should be FKEY or rsrc, depending on the utility used to launch the file. fmnu fmn2These resources, provided in the Finder and files such as the Desktop Printer Extension, add a menu item to the Finder. The shortcut key for each item appears before the menu name, as shown in this fmn2 resource, which exists in recent versions of the Finder file:-

In this example, ⌘-N is the shortcut for New Folder. To change this to ⌘-F you simply replace the letter N by an F. If there’s no letter in the space designated for a shortcut you can add your own chosen character, taking care to avoid any shortcuts already used in the menu.
The itl1, itl2, itl3, itl4, itlb, itlc and itlk group of resources, which are described below, are concerned with localisation of the system, allowing your computer to accommodate ‘international’ languages and scripting systems, as well as the associated number and date formats.
These resources can also be provided inside applications, where they can override those in the System file to ensure consistent results across the world. For local operation these are often best removed or replaced with copies from your System file. For the Roman script, as used in most European languages, you need only consider the itl0 and itl1 resources.
 itl0
itl0This resource sets the number, date, and time formats, the System Region code, indicates the use of metric rulers and conveys a version number. It was formerly known as an INTL resource and has an ID of 0, so it’s also known as INTL 0.
The System Region codes are specified as numbers, the most common being:-
| Region | Code |
|---|---|
| United States | 0 |
| France | 1 |
| Britain | 2 |
| Germany | 3 |
| Italy | 4 |
| Netherlands | 5 |
| Belgium/Luxbg | 6 |
| Sweden | 7 |
| Spain | 8 |
| Denmark | 9 |
| Portugal | 10 |
| French Canada | 11 |
| Norway | 12 |
| Israel | 13 |
| Japan | 14 |
| Australia | 15 |
| Arabic | 16 |
| Finland | 17 |
| Swiss French | 18 |
 itl1
itl1This resource sets names for months and days, using up to 16 bytes for each. It also sets the long date format and the number of letters used for abbreviated months or days. A Region code and version number are also included. This resource was formerly known as INTL 1.
itl2 itl4These resources set the language used by your computer. Generally speaking, the System Language codes match those for the System Region codes (see above), although by default most versions of the Mac OS designed for the Roman script only support the following:-
| Language | Code |
|---|---|
| English | 0 |
| French | 1 |
| German | 3 |
| Italian | 4 |
| Dutch | 5 |
| Swedish | 7 |
| Spanish | 8 |
| Danish | 9 |
| Canadian French | 11 |
| Finnish | 17 |
| Swiss German | 19 |
| Greece | 20 |
| Iceland | 21 |
| Malta | 22 |
| Cyprus | 23 |
| Turkey | 24 |
| Yugo/Croatian | 25 |
| India/Hindi | 33 |
| Pakistan/Urdu | 34 |
| Lithuania | 41 |
| Poland | 42 |
| Hungary | 43 |
| Estonia | 44 |
| Latvia | 45 |
| Lapland | 46 |
| Faroe Islands | 47 |
| Iran | 48 |
| Russia | 49 |
| Ireland | 50 |
| Korea | 51 |
| China | 52 |
| Taiwan | 53 |
| Thailand | 54 |
| Brazilian | 71 |
 itlb itlc
These resources accommodate languages based on non-Roman scripts, such as Arabic or Japanese. Modern versions of the Mac OS usually accommodate these with the Unicode scripting system.
 itlk
itlkThis accommodates non-standard international key assignments on a keyboard by normalising the keyboard’s output to match a basic map that’s contained in the KMAP resource.
 KCHR
KCHRThis resource, contained in the System file, converts the keyboard output, as set by the KMAP and itlk resources, into ASCII codes understood by a Mac. In other words, it provides software keyboard mapping. A separate KCHR exists for each keyboard layout in the System file.
ResEdit’s KCHR editor window, shown below, contains keyboard tables in the right-hand panel that are linked to specific modifier keys. The character chart (left) shows all 255 characters in the font whilst the virtual chart (centre) shows the 128 characters available in the selected table.

Any depressed keys are highlighted in the keyboard region (bottom left), together with a matching character in the charts: in this instance, the letter r has been pressed, but without any modifier keys. The information region (centre right) shows the corresponding character and keyboard codes.
The tables are defined as follows:-
| Table | Modifier Keys |
|---|---|
| 0 | None / ⌘ / ⌘-Shift |
| 1 | Shift / Shift-Caps Lock |
| 2 | Caps Lock |
| 3 | Option |
| 4 | Shift-Option |
| 5 | Caps Lock-Option |
| 6 | ⌘-Option |
| 7 | Control plus any other |
The editor’s KCHR menu lets you create a New Table or Duplicate Table for your own combinations of modifier keys. Just hold down the required modifier keys whilst selecting these items or when transferring new characters onto the keyboard map.
 KMAP
KMAPThis resource, contained in the System file, incorporates a record of the keyboard’s hardware mapping. In other words, it knows the actual codes that are produced by each key.
 MACS
MACSThis indicates the Finder or System file version. In case of the System file the relevant text is contained in a STR resource with an ID of 0.
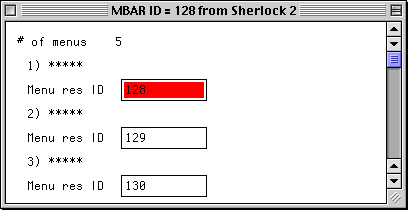
 MENU
MENUThis enables and defines a menubar item, including related keyboard shortcuts. An mctb resource can also be used to add colour to such a menu.
MENU must ascend by one digit as you move across the menubar.MENU can be changed but must not be deletedDragging menu items around, including dividing lines, can cause confusion: this is due to the fact that applications identifies the items by ID, not by name. If you select a menu item, you can change its Text and text Colour, as well as Cmd-Key, the key used with ⌘ as a shortcut.
The following Cmd-Key letters have standard uses, usually appearing in the order as shown:-
| Menu | Letters |
|---|---|
| File | N, O, S, W, P*, Q |
| Edit | Z, X, C, A, V |
| Style | T, B, U, I |
Further options are available under the MENU menu although the Edit Menu & MDEF ID window is usually best left alone. Choose Icon lets you add an icon at the left of a menu item and Remove Icon takes it away. Any associated ICON or SICN resource must have an ID of between 257 and 511 and you should select Preload under Get Resource Info for fast operation. Not surprisingly, Remove Colour removes a menu item’s text colour while Use Colour Picker lets you choose a colour using the Mac’s Colour Picker instead of a simple selection of standard system colours.
mstrThis is used to store file strings such as File or Quit in the System file, allowing any application to open files or quit other applications. The term Quit is also used to shut down the Finder.
 PICT
PICTThis resource contains an image that can be copied into a drawing application for editing. Although graphics of over 2 × 2 inches are scaled down in lists, they expand to full size when opened.
The window and the position of the PICT within it can be modified by selecting Open Using Template and adjusting the parameters shown at the top of the window.
PICT resource. However, this won’t work if the splash screen also includes some kind of dialogue.PICT image is locked into the text by a marker in the form of an Option-Space character, which is hex CA (decimal 202). The images themselves have IDs that begin at 1000. A similar mechanism is used in DOCMaker, although the PICT resources in this instance begin with an ID of 2001.You can make this kind of SimpleText file as follows:-
PICT resources, the first of which has an ID of 128.PICT, modify all of the resources so that the first image has an ID of 1000, followed by 1002 and so on.TEXT to ttro. pltt
plttThis palette resource determines the colours used by an application in a particular environment. Some applications use a pltt 0 resource as the default palette.
pnotThis contains information about the preview of a file, shown in a Standard File Open (SFO) dialogue and is added to a document when you select Create in such a dialogue. The preview is in a PICT or TEXT resource, although a text preview is usually limited to a maximum of 255 characters.
The sixth byte of a pnot contains the ID of the PICT or TEXT resources, as shown in this example:-
AE2C DCBD 0000 5049
4354 6B42 0001 B923
8C43 5072 6576 5049
4354 0100 0000 0000
0000
where the preview resource is seen to have an ID of hex 6B42 (decimal 27458).
Many EPSF graphics files lack a pnot resource, which means they don’t incorporate a preview. However, EPSFs created in the Mac OS often contain a low-resolution image in the form of a PICT resource with an ID of 256. Fortunately, although intended for layout purposes, this can also be used as a preview. To make this possible you must add a pnot resource containing the following:-
AE2C DCBD 0000 5049
4354 0100 0001 B923
8C43 5072 6576 5049
4354 0100 0000 0000
0000
where hex 0100 (decimal 256) is the ID of the existing PICT resource.
To add a preview to an EPSF you can create a ResEdit file containing the above pnot resource. You can then name this file as EPSF Preview Resource and proceed as follows:-
pnot resource.pnot into the EPSF.The preview should now be available.
If you require a preview as well as a custom icon you can use this procedure:-
pnot resource.pnot into the EPSF.PICT resource in the EPSF.The preview should now appear and the EPSF’s icon should be a small replica of it’s contents.
pnot resource. PREC
PRECThis contains printer defaults and is kept inside a printer driver or application file. The relationship between the PREC resource of each ID number and the defaults is as follows:-
| Resource | Default |
|---|---|
| PREC | From |
| PREC | Page |
| PREC | Printer |
The PREC 4 resource in an application file usually overrides the settings contained in the driver’s PREC 3 resource. Other PREC resources can be found inside PostScript applications.
 SIZE
SIZEThis indicates a file’s memory needs, as presented in the Get Info dialogue. The SIZE -1 resource contains the Suggested Size and Minimum Size values, as set by maker of an application, while the SIZE 0 or SIZE 1 resource indicates the Preferred Size, which can be adjusted by the user.
All the SIZE resources include the following flags:-
| Flag | Application |
|---|---|
| MultiFinder | Operates |
| Suspend | Operates |
| Background | Works |
| Background | Has |
| Get | Receives |
| 32 | Works |
 snd<space>
This resource contains a Format 1 sound or Format 2 sound. Only the latter can be used with HyperCard, although some older Format 2 snd resources can be labelled as format 1. If you select Open Using Hex Editor you’ll see the format number in the second data byte.
In the snd menu you can hear the sound whenever you choose Try Sound. If an error occurs you should use Try as HyperCard™ Sound: if this works it’s a Format 2 sound. Try Scale With Sound plays the sound over a musical scale.
snd resources contain a header that creates a sequence of notes or a continuous loop of the sound. When you double-click a file containing such a snd you’ll hear the sequence or loop, but as an alert it only makes the basic sound. STR<space>
This resource contains a plain text string, as employed in dialogues and other windows.
 STR#
STR#This contains a list of plain text strings. These strings are often used in windows or to define the default names of files used by an application or other software. The following table shows how STR# resources are used in one version of Netscape:-
| Resource | Items | Content |
|---|---|---|
| 301 | 10-15 | Six |
| 4000 | 1-6 | URLs |
 styl
stylThis resource is often used to add style information to text that’s contained in the data fork of a document. It’s also used with a TEXT resource for styled text inside an application.
 TEXT
TEXTThis contains plain text that can be used with a styl resource to give styled text.
 TMPL
TMPLA special template resource, often used by programmers for storing special information. You can use the Tab key to move forwards through the parameter boxes that you’ve created or Shift-Tab to move backwards. On opening a template, ResEdit doesn’t check to see if the data fits. If the data is too big it may crash or the data may get truncated; if too small it may pad out the data with zeros. In some instances, you’ll find it impossible to close a TMPL window, in which case you should quit ResEdit.
 vers
versThis provides information for a file’s Get Info window. The vers 1 resource gives the text for the Version area in the window while the vers 2 resource provides an optional line of text beneath the filename. If a vers 1 resource isn’t present the signature resource is used instead.
 WIND
WINDThis resource sets the size, screen position and title for any window whose contents isn’t set by a DITL. A WIND can be resized by dragging at the bottom right-hand corner or moved by clicking and dragging anywhere in the window.
The value of ProcID, as shown in the template, defines the type of window: to include a zoom box, simply add 8 to this number. In some instances you can modify a WIND to give extra control over the window. For example, Sherlock 2.0.2 doesn’t normally let you resize the Search Internet window. However, if you go into the Sherlock application file with ResEdit you can change this. Simply open the WIND resource whose ID is 1200 and then select the first kind of window shown at the top of the editor window. Then save the file and use your new version of Sherlock as normal.
A wctb resource can be added to provide colour. However, if you open such a wctb resource you’ll find yourself inside the related WIND resource.
©Ray White 2004.
