 The System The System
A computer’s operating system (OS) determines its basic behaviour, including responses to instructions and how data is handled in conjunction with a disk drive or a network.
Some Classic Mac OS instructions are stored in read only memory (ROM), although modern machines keep the majority in the System file, as well as in other files located in the System Folder on the machine’s startup drive. During startup, the information in these files is transferred to the computer’s random access memory (RAM), the main memory of the machine.
 System Versions
Each time the Mac OS is upgraded a new version is issued, which you can install if it’s suitable for your machine. If, however, you’re happy with your system, you can leave it alone.
You’ll find information about the more important editions of the Classic Mac OS below. The amount of RAM required by older systems is rarely a problem. For example, Mac OS 7.6.1, without any of its fancy control panels and extensions, requires only 1.8 MB of RAM, which means that it can be easily used on older machines that have only 4 MB of RAM.
The real difficulties revolve around whether or not your machine is 32-bit clean and on its type of processor. Older models have a 68000, 68020, 68030 or 68040 device, collectively known as the 680x0 series, whilst newer types have a 603, 604 or 750, all under the PowerPC banner. Later editions of the Classic Mac OS can’t be used on models that aren’t 32-bit clean or on Macs that have a 68000, 68020 or 68030 processor: the latest versions don’t support 68040 either.
The is the oldest system that can be used to run ‘modern’ Classic programs on a 680x0 machine: even an ancient Mac 128 works with this version. If your machine isn’t 32-bit clean you must install MODE32 software, which also lets you use more than 8 MB of memory. If you’re using System 6.04, you should upgrade to System 7.1 or higher, assuming you’ve enough memory and hard disk space.
You should only need to use one of these versions of the system if your computer:-
Note that you must have System 7.5.3 or higher in order to use Personal Web Sharing.
You should only need to use this version of the system if your computer:-
This version of the system requires at least 12 MB of memory, although 20 MB or more is preferable. In addition to PowerPC models, only the 68040 is supported, and this must be integral to the machine, not fitted on an upgrade card. Mac OS 8 and later systems don’t support PowerTalk, although they do include live scrolling and other notable improvements to the user interface.
This is the last version of the system that can be used with a 68040 machine, requiring at least 16 MB of RAM and 200 MB or more of disk space.
This system accommodates the later form of Hierarchical Filing System (HFS), known as Mac OS Extended format or HFS Plus (HFS+). This reduces the size of disk blocks on your disk drive, increasing the available storage space. It also allows up to 255 characters in each filename, although these are only recognised by PC Exchange. In addition, the date and time labelling mechanism for files is different and allows for daylight saving. Unfortunately the latter can cause confusion, especially for automatic backup software. These improvements are incompatible with older versions of Norton Utilities, Speed Doubler and StuffIt SpaceSaver. In theory, there could be problems with any drive not formatted with HFS+, although the author hasn’t encountered any difficulties.
This system requires a PowerPC-based machine and refuses to work on any kind of computer that contains a 680x0 processor. It incorporates an HTML-based help system, centred around an application called Help Viewer. This employs V-Twin technology for indexing, as used for Find by Content in the new version of Find File. This modern OS also has a new Internet Preferences control panel, supporting the established Internet Configuration System, while the PC Exchange and Mac OS Easy Open control panels are combined into a new File Exchange application.
In this system the Find File application is replaced by Sherlock, a powerful application that can search for information on the Internet as well as on your hard disk drive. Internet access is also tidied up, with the Internet control panel replacing older panels as well as the Internet Config application, and a new Remote Access control panel that also replaces the older PPP panel.
This system incorporates Navigation Services, providing new features in the Open and Save dialogues of those applications that support it. Favorites can now be added to dialogues from contextual menus, while Control Strip modules can be added or removed by simply dragging them in or out of the Control Strip Modules folder, but without having to restart the computer. In addition, an improved Get Info dialogue is provided, allowing you to easily change an item’s Name or Label.
OS 8.5 employs native AppleScript, so non-native files in the Scripting Additions folder are best avoided, as switching between PowerPC and 680x0 code can make scripts rather slow. The Apple Menu Options, Appearance, File Exchange, File Sharing and Location Manager control panels are scriptable, as are the Apple System Profiler, Apple Video Player, Disk Copy and Help Viewer applications, and the Application Switcher, Apple Guide and ColorSync extensions.
The Scripts folder in the new System Folder is organised on an application-by-application basis, as pioneered by OSA Menu, an extension that lets you launch compiled scripts from the menu bar. This version of the system also lets you attach folder actions to any chosen folder. The relevant scripts should be kept in the Folder Actions folder inside the Scripts folder.
The computer’s clock now runs according to Co-ordinated Universal Time (UTC), instead of GMT, and has knowledge of the daylight saving used in your geographical area. It can also be automatically synchronised to an external time reference.
Essentially, this is an enhanced version of OS 8.5 that provides support for multiple users and incorporates an improved version of Sherlock known as Sherlock 2. It also has a very useful feature that lets you encrypt files and keep your passwords in a keychain. This version of the system also sees the appearance of OpenGL, an API (see below) and software library from Silicon Graphics Inc (SGI), commonly used in PCs for 3D applications and destined to replace QuickDraw 3D.
These versions of the system, which mark the end of the road for the Classic Mac OS, are designed to work alongside Mac OS X (see below), although they can be used in the normal way on current machines. However, Classic applications can also be launched from within Mac OS X by using Classic, a special application that runs Mac OS 9.x from inside the newer system.
Although beyond the scope of this article, some mention must be made of Apple’s new Unix-based system, which is created entirely in PowerPC-native code, is optimised for the G3 processor and provides a protected memory system as well as preemptive multi-tasking.
Although OS X runs older applications in the Classic environment (see above), some programs, known as Carbonized applications, run directly in both Mac OS 9.x and Mac OS X. To make this possible, Apple have abandoned around 2000 of the 8000 original application programming interfaces (APIs) supplied by the Toolbox in the Classic Mac OS, many of which are rarely used by modern applications and several of which include 680x0 code. This ‘streamlined’ set of APIs, known as Carbon, is incorporated into Mac OS X and accommodated by the CarbonLib file (see above) in older systems. By this means, Carbonized applications can be used in both systems.
Although most older applications operate normally from within the Classic environment, some programs require you to restart your computer under Mac OS 9.x, assuming this is possible with your machine. Most of the original drivers for any extra hardware should work through Classic, although new drivers are needed to use such hardware directly from within Mac OS X. Once again, if your drivers fail to work in Classic, you may have to restart your computer in Mac OS 9.x.
 Installing the System
The system installation process transfers a System Folder, complete with necessary files, onto the startup drive of your Macintosh computer. Typically, one or more Installer applications select the necessary resources for your model and then place them onto your drive.
Installation is necessary if you have:-
In the case of a damaged system the symptoms may include a Sad Mac icon at startup or excessive crashes with various applications, usually including the Finder.
Before beginning the installation process it’s vital that you back up the entire contents of your startup drive, preferably onto two separate backup disks. Then, if you haven’t done so recently, you can take the opportunity to format the drive. Note the following points:-
The CD-ROM used for an installation usually contains CD driver software, allowing you to start up your computer from the CD itself. Just insert the CD and the use one of the following methods:-
If the CD ejects itself prior to startup you should quickly push it in again.
With newer CDs, you’ll see a desktop background containing Mac OS icons when startup is complete. In addition, the CD icon should appear above your disk drive on the desktop.
In some instances, you may find that none of the above methods work, in which case you’ll have to run the installation software from another copy of the system, either on the machine itself or on another drive. This is a risky strategy, since you’ll be installing your system software using a copy of an operating system that could be corrupted. To minimise problems you should get a system working on your machine and then:-
Assuming all is well, you can double-click the Mac OS Install icon on the CD.
For convenience, the files on an installation CD-ROM can be copied onto a removable disk for later use. Alternatively, you can load a disk from a set of installer diskettes as follows:-
To actually install from the disk you should proceed as follows:-
Steps 2, 3 and 8 can be omitted if there’s no System Folder on the Mac’s startup drive. You can also avoid these steps if you hold down ⌘-Shift-Option-Delete as the machine starts up, but only when there are no other drives connected to the machine that have a valid System Folder.
If you’ve successfully started from the removable disk you’ll see its icon above your startup drive. Once this far you can double-click on the Mac OS Install icon.
This is the only option if you have a Mac without a system and you don’t have a removable disk or CD-ROM drive. You should note, however, that modern versions of the Mac OS aren’t available in this form. Older versions of the system are usually available as several sets of diskettes, the first disk of each set containing the appropriate Installer application.
To install the system this way you should:-
You can then double-click on the Mac OS Install icon and proceed with the installation.
 Running Mac OS Install
The Mac OS Install application provides a front end for all the individual Installer documents that provide various parts of the system. If you don’t want to re-install all of your basic system software you can open a specific Installer file without running Mac OS Install. For example, if you only want to install OpenDoc, just locate the OpenDoc folder on the disk and open the Installer file inside. These individual installer folders are sometimes in a folder called Software Installers, which is frequently out of view at the bottom of the window: just scroll down and you’ll see it.
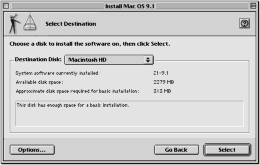
The appearance of Mac OS Install varies with the software that you’re installing. This, for example, is what you’ll see when you run the software to install Mac OS 9.1:-

When you click on Continue this window appears, allowing you to choose the destination drive:-
At this point you can click on Options, which presents the following dialogue:-
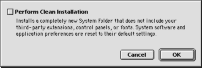
Selecting Perform Clean Installation forces Mac OS Install to create a new System Folder instead of updating the existing folder. The original folder is then renamed as Old System Folder or Previous System Folder. Immediately after installation you must retrieve any non-standard system files that you need from this folder, including control panels or extensions not supplied with the system and then move the folder to the Trash and empty the latter.
Back in the main window, pressing on Select may cause the following dialogue to appear:-
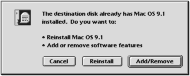
which gives you the option of re-installing the software or modifying the existing system. Having made your choice you must pass through the ‘legal’ windows and dialogues to see this:-

Simply press Start if you want a simple life or this is your first installation.If not, you can select Customize to reveal the more detailed listing shown below, in which you can select or deselect specific items. This is particularly useful if you want to save disk space or if you want to re-install particular items that have failed on your machine.

If you press Options at any point you’ll get this dialogue:-

Selecting Update Apple Hard Disk Drivers is recommended, especially if you’re updating from an older version of the system. Create Installation Report can also be useful, as it generates a text file showing what has been installed, the location of each item in the System Folder and any errors.
Once you’ve pressed the Start button in main window the individual Installer files are opened. In the case of older systems you’re then presented with a sequence of windows, allowing you to customise the installation for a particular element of the installation. Fortunately, in more recent installers this customisation process has been combined into a single operation, as described above.
When installation is complete you should check that it’s effective by selecting About This Computer under the Apple, which in the case of Mac OS 9.1 should look something like this:-

A system update is an incremental revision, upgrading System 7.6, for example, to System 7.6.1. It usually adds new components to the System Folder as well as other updated Apple software.
A given Installer can only update a recognised system and may (or may not) include all the software to upgrade from a previous version. For example, any version of System 7.5 can be updated to System 7.5.3 but a complete installation of System 7.5.3 has to be in place to update to version 7.5.5.
Before installation using an update you should:-
An Easy Install option, if available, automatically installs all the files necessary for your computer whilst Custom Install can be used to add individual items.
In theory, you must always use an Installer to replace damaged system files. In practice, if your original installation was made using the default settings, you can drag replacement copies of any damaged file into your System Folder. You should then select Special ➡ Restart. The System and Finder files are the most likely candidates for replacement.
To make this possible you should backup a ‘pristine’ version of your System Folder onto a removable disk or install a full system onto the disk. Ideally, you should keep copies of all your installation software on the disk as well, so as to cater for any eventuality. Whilst you’re at it you can include your disk formatting application and a disk-mounting utility such SCSIProbe or HDT Prober.
When you drag individual files into your System Folder the files are unlikely to be in the optimum locations on your disk and could run slower. You can minimise this problem by replacing only those files that give problems. Better still, erase the disk, copy only a backup of the repaired System Folder onto it and then copy over the remaining files, thereby creating a reasonably optimised disk. Or you can use an optimisation program, such as CP Optimizer that comes with MacTools.
©Ray White 2004.
