 Working with a Printer Working with a Printer
Most people have problems with printing, especially when they’re in a hurry. Unfortunately, dubious computer software and a slow mechanical device don’t always make a good combination.
The images on a computer screen are usually generated by mathematical techniques known as vector graphics or object-orientated graphics. The system used in the Classic Mac OS is QuickDraw. During printing, the QuickDraw descriptions that have been created by the application are rasterised so as to create a bitmap image for the printer.
The commonest graphics system for desktop publishing (DTP) applications is PostScript. This incredibly flexible language, which was devised by Adobe, can describe anything from a single font to a full page of text and graphics. PostScript data can be stored in a PostScript file, in an encapsulated PostScript file (EPSF) or in a Portable Document File (PDF).
A PostScript-based application uses PostScript to create images but puts the results onto the Mac screen using QuickDraw, which explains why PostScript applications are slower than QuickDraw-based software and use vast amounts of memory.
A printer that understands PostScript instructions is known as a PostScript printer whilst other printers are commonly known as a QuickDraw printer or non-PostScript printer, despite the fact that these devices don’t have any actual connection with PostScript or QuickDraw.
Before using your printer you must of course connect it to your computer, install the specific printer driver software for the printer as instructed and switch it on. Only a few printers, notably those originally produced by Apple, will work without installing special software.
The following points may be of interest if you’re operating a network:-
Getting a non-PostScript printer to work is easy: you open the Chooser, select the required printer and options and then close the window, after which a desktop printer appears on the Desktop.
Creating a desktop printer for a PostScript device is slightly trickier, since you must first run the Desktop Printer Utility. In this application you’ll normally set With to LaserWriter 8, which is the default PostScript printer driver, and choose the type of printer in the Create Desktop menu. Having done this, you can move on to a window showing the PostScript™ Printer Description (PPD) File. Normally, you’ll have to select Change and pick your printer from the list that appears.
To use an infrared printer you should proceed as follows:-
 The Chooser
As already mentioned, you can use the Chooser to select a printer. Typically, it looks like this:-

where the left-hand pane shows the available printers, as determined by the Chooser extension files in your Extensions folder, which is inside the System Folder.
The right-hand pane lets you choose other options, such as the port used to connect the printer or the actual printer that you want to use via an AppleTalk network.
Each Chooser extension file contains software that converts the data created by an application into a form understood by a specific type, or types, of printer. Most driver files are named after the printer or a related model. Such files only work if they’re resident in the Extensions folder.
Special software, such as Chuck’s Printer Driver, lets you use almost any printer with an older Mac that has ‘classic’ Printer and Modem ports. However, if the printer has a parallel port, sometimes known as a Centronics interface, you’ll also need a parallel to serial converter.
 LaserWriter 8
The LaserWriter 8 Chooser extension works with almost any kind of PostScript-based printer, most of which are in the form of a laser-class printer. It also requires a suitable PPD file for your printer in the Printer Descriptions folder, which is in Extensions, inside the System Folder.
Version 8.5.1 and later editions of LaserWriter 8 can also create PostScript files, Encapsulated PostScript Files (EPSFs) or Acrobat Portable Document Files (PDFs), although the latter needs Adobe’s Acrobat Distiller application. To ‘print’ a file, set the Destination pop-up in the Print window to File. In the left-hand menu, just select Save as File, where you can choose the type of file to create.
The behaviour of a PostScript printer is determined by its PPD file (see above). Each PPD file is actually text file, containing information about the printer in the form of PostScript instructions. Such a file can be viewed and modified using a standard text editor, such as BBEdit (Bare Bones Software), allowing you can to change the way in which your printer works.
true or false. For example, if the duplex feature doesn’t work on your printer, try searching for duplex and then replace its false by true. Desktop Printing
This feature, provided by the Desktop Printer Extension in older systems, lets you print documents by dropping them onto a desktop printer icon. A new desktop printer automatically appears on the Desktop whenever you select a previously unused printer in the Chooser.
The desktop printer’s icon varies to indicate the printer’s status, as shown here:-
| Icon | Possible Meaning |
|---|---|
| Paper | Printing |
| Hazard | Warning: |
| Hand | Printer |
| Crossed | Desktop |
When you select a desktop printer, you’ll see a Printing menu in the menubar, giving you control of the printer. But when you open the printer you’ll see the documents awaiting printing, as shown here:-
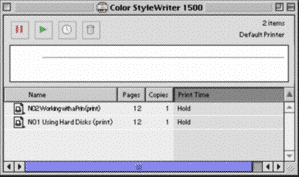
Once the printing of a document is underway it moves into the top pane. However, you can also select items in the list and click on one of the buttons at the top of the window to obtain a required action. Working from left to right, the buttons are Hold, Resume, Set Print Time and Trash.
The following applications are used for desktop printing:-
 Desktop PrintMonitor
This program, which normally resides in the Extensions folder, enables background printing, allowing you to do other things whilst printing is progress. It requires desktop printing to be enabled, employing the Desktop Printer Spooler file in the Extensions folder. This application provides the window that appears whenever you open any desktop printer (see above).
 PrintMonitor
This application is similar to the newer Desktop PrintMonitor (see above), but is only used when desktop printing isn’t employed. By default, it’s invisible during printing, only making itself known if something goes wrong. However, it can be set to show a window at all times, revealing the name of the document currently being printed in a Printing area and other documents in a Waiting area. At any time, you can select an item in the latter list and click on Cancel Printing or Set Print Time.
 Page Setup and Print Dialogues
Some of the many options that appear in Page Setup and Print dialogues are listed below.
Only suitable for printing text that doesn’t have any half-tone details.
This gives faster printing of bitmap fonts and graphics. If your document contains imported bitmap images, such as TIFF files or scanned images, it’s best to turn this off.
This causes older bitmap fonts that aren’t used in modern systems, namely New York, Geneva and Monaco, to be replaced by PostScript versions of Times, Helvetica and Courier respectively. Some versions of Adobe Type Manager don’t support this feature.
This option, also called Fractional Widths, can appear in an application’s Preferences window or in a printer dialogue. If you can’t find it in either of these places you can enable or disable it prior to printing by using a special FKEY known as Font Control.
Fractional Widths aren’t normally enabled, which means that printed characters are spaced at multiples of one pixel (1⁄72 inch), giving a result that doesn’t always look satisfactory. With Fractional Widths enabled the characters are spaced to a much greater accuracy, but may look peculiar on the screen, where the resolution is usually limited to 72 dpi or thereabouts.
This eliminates harsh jagged edges on bitmap graphics. If your document contains imported bitmap images, such as TIFF files or scanned images, it’s often best to turn this off. Apparently, this option is only available with the LaserWriter 8 driver if you’re using an Apple printer.
Lets you print 1, 2 or 4 pages on a single sheet, selected by 1 Up, 2 Up or 4 Up, with optional borders around each page.
Determines whether the page is printed as a portrait (the usual way) or as a landscape (sideways). The dogcow indicates this, although the ‘little man’ icon (when provided) is less confusing.
This never seems to be the size you want. In some instances you may have to resort to a larger size than you require with the document carefully designed not to spill over the edges of the paper.
Also known as Bit Map Alignment, this gives a size reduction of 96%, in the process aligning the 72 dots per inch (dpi) resolution of a screen to the 300 dpi resolution of a standard laser printer. This makes one screen pixel equal to exactly four dots on the printer, resulting in a far less jagged printout.
Some reductions or enlargements may give lumpy results. Try using 96%, 72%, 48% or 24%.
Only used with the ancient ImageWriter printer, which has a resolution of 80 dpi horizontally and 72 dpi vertically. However, when you select Tall Adjusted it prints at 72 dpi in both directions. Although this option stops circles looking like ovals it increases the document’s width by 11%.
Improves the appearance of any text that’s been created with bitmap fonts. If you don’t select this option some text may appear ragged.
 The Printing Operation
Printing is usually started by choosing File ➡ Print or dragging a file onto a desktop printer. However, you can also highlight several documents in the Finder and then select Print without manually opening all the documents or applications. If desktop printing is available, you can also drag the documents onto a desktop printer. During printing, the appropriate applications are launched, the printing of each document is executed and the applications are closed again.
Problems with memory can be fixed using one or more of the methods listed below. Note that references to Desktop PrintMonitor also apply to the older PrintMonitor application.
It seems that the LaserWriter 8 and Adobe PS drivers always default to the A4 Small paper size on a British system, whatever printer you use. This isn’t smaller than A4: it just employs bigger margins, shifting your pages down and to the right of the paper by just over one-third of an inch.
Applications behave in three different ways:-
The author suspects that the default Paper settings are kept as localisation data in the System file. However, it isn’t in textual form within any of the resources, so it’s almost impossible to find.
References to Desktop PrintMonitor in this section also apply to the PrintMonitor application.
< print > at the ends of their filenames, don’t need to be kept. QuickDraw GX
QuickDraw GX lets you use GX fonts and GX-compatible applications to exploit its enhanced printing facilities, although it’s not supported by Mac OS 8.x or higher.
Double-clicking an item in the Printing menu gives you a preview of the selected document via the SimpleText application. Also in the Printing menu, you’ll see Extension Setup, which lists all of the available GX printing extensions, corresponding to files in the Extensions folder. You can check the items in the list that you require or drag them into a new order.
The following printing extensions are supplied with QuickDraw GX:-
Lets you configure a PostScript file created using the LaserWriter GX printer driver, and if the file’s in EPSF form, you can import it into other applications. You can use Printing ➡ PostScript File Options to set it up.
Lets you print up to 16 pages on one sheet with optional borders around the pages. You can set options using Printing ➡ N-Up Printing Options or by clicking N-Up in the Print dialogue of a GX application, or you can use File ➡ Page Setup as normal.
 Paper Types
QuickDraw GX comes with a Paper Type Editor application for creating custom paper types, which lets you edit the size of the paper and its printable area. The resultant paper type can then be used with any application, whether it’s aware of QuickDraw GX or otherwise.
First select File ➡ New in Paper Type Editor and choose a printer from the Printer pop-up. To work from an existing paper size, choose one from the Based On menu. Alternatively, you can open a paper type file that’s in the Extensions folder.
The Units menu lets you change units used for measurements. To set the paper size simply type into the Width and Height boxes. And you can change the print area by dragging the picture outline or typing in new values.
You must use File ➡ Save As to save your new paper type in the Extensions folder, after which the new paper type appears in both the Page Setup and Input Tray dialogues. You can remove a paper type by dragging the file out of Extensions.
QuickDraw GX is supplied with the paper type files entitled 3-Hole Punch, Letterhead and Stationery.
 Portable Digital Documents
QuickDraw GX can create Portable Digital Documents (PDDs) that can be read by any Mac equipped with QuickDraw GX, whatever applications and fonts are on the machine. Previous attempts at a universal document format have not been successful due to a lack of general acceptance. Alternative examples include Acrobat and DOCMaker.
Since PDDs can contain all the required fonts for a document they can be very large. PDD Maker GX lets you to select which fonts to include, such as All Fonts, Non-standard Fonts or No Fonts. If either of the latter are chosen you’ll need to know which fonts exist on the destination machine.
When QuickDraw GX is installed it also provides the following special applications:-
Lets you convert PostScript Type 1 fonts into QuickDraw GX compatible versions. Although the original fonts may only appear in certain sizes, the converted versions are scalable to any size.
You must use Custom Install to get this file. It lets you to turn off QuickDraw GX from the Apple menu. This can be very useful for applications that are incompatible with GX.
Metric paper sizes are as follows, where W is the width, H the height:-
| W | H | W | H | |
|---|---|---|---|---|
| A0 | 841 | 1191 | 33.1 | 46.8 |
| A1 | 594 | 841 | 23.4 | 33.1 |
| A2 | 420 | 594 | 16.5 | 23.4 |
| A3 | 297 | 420 | 11.8 | 16.5 |
| A4 | 210 | 297 | 8.3 | 11.8 |
| A5 | 148 | 210 | 5.9 | 8.3 |
| A6 | 105 | 148 | 4.1 | 5.9 |
| A7 | 74 | 105 | 2.9 | 4.1 |
| B4 | 257 | 364 | 10.1 | 14.3 |
| B5 | 182 | 257 | 7.2 | 10.1 |
whilst others include:-
| Size | W | H | W | H |
|---|---|---|---|---|
| Folio | 210 | 330 | 8.3 | 13 |
| Foolscap | 216 | 330 | 8.5 | 13 |
| Legal | 216 | 256 | 8.5 | 14 |
| US | 216 | 279 | 8.5 | 11 |
| Inter | 210 | 304 | 8.3 | 12 |
| Ledger | 279 | 432 | 11 | 17 |
©Ray White 2004.
