Managing Memory
The main part of a computer’s memory, known as random access memory (RAM), retains data independently of the disk drive. It acts as a temporary store for the system, documents and applications. If your computer crashes or there’s a power failure its contents are lost.
 The Workings of Memory
If you select About this Computer under the Apple menu in the Finder you’ll see how much RAM is in your machine. If the figure for Total Memory is bigger than Built-in Memory or a figure isn’t given for Total Memory you must be using virtual memory (VM) or RAM Doubler.
The amount of RAM required depends on the demands of your system and on the size and number of applications in use. The following table gives guidelines for the minimum and maximum RAM needed for older versions of the Classic Mac OS, as well as the RAM used by the system itself:-
| Mac OS | Minimum | Workable | System RAM |
|---|
| 6 | 1 MB | 2 MB | 500 K |
| 7 | 2 MB | 4 MB | 1.5 MB |
| 7.5 | 4 MB | 8 MB | 2 MB |
- Mac OS 8.x needs at least 64 MB of RAM, with 20 MB or more being used by the system itself, while Mac OS 9.x ideally requires 128 MB of RAM or more.
A modest application uses between 500 K and 2 MB of memory, although some multimedia applications can quickly use all the memory in your machine. The memory required by an open document is dependent on its size: the following table gives a rough guide to how many kilobytes are needed to represent text, assuming an average of 6 letters per word:-
| Words | Memory
(K) |
|---|
| 170 | 1 |
| 500 | 3 |
| 1000 | 6 |
| 1700 | 10 |
| 2500 | 15 |
| 5000 | 30 |
| 8500 | 50 |
| 10000 | 60 |
| 12500 | 75 |
| 17000 | 100 |
In practice, a text document often use more memory, depending on the file type. However, a graphics file can absorb vast amounts of memory. For example, a black and white image covering a standard A4 page uses around 1 MB. This rises to 8 MB for 8-bit colour or to 23 MB for 24-bit colour. And these figures can be doubled again if your graphics application has an Undo feature.
Allocating Memory to an Application
The memory allocated to an application is set within the application itself. To change this allocation you must quit the application, select its icon in the Finder and choose File ➡ Get Info ➡ Memory, which should reveal a window similar to this:-
The Suggested Size is the amount of memory that you’re advised to use by the maker of the application and can’t be changed from within the window. When the application is next launched it tries to use the Preferred Size as its memory allocation, but if this isn’t possible, it uses any available memory in the range between Minimum Size and Preferred Size.
- Although Minimum Size is often slightly smaller than Suggested Size it’s often a good idea to enter the latter value or an even greater value in the Minimum Size box.
If you’re using Mac OS 8.6 or higher you may need to set both Minimum Size and Preferred Size to a higher value than that shown under Suggested Size, especially if Virtual Memory isn’t enabled in the Memory control panel (see below). Even with earlier systems, many applications are happier with a bigger slice of memory, especially if data is stored in the application’s own memory area.
- Using low values for Minimum Size and Preferred Size can cause applications to crash.
- Some applications use system memory for data, which means you don’t need to adjust their memory space to accommodate large files. In fact, doing this could make things worse.
- The smallest change you can make to Minimum Size and Preferred Size is 16 K.
- If you change any settings it’s worth noting down the original values so that you can restore them back to normal at a later date.
- Software designed for a 680x0-based machines and produced before 1990 isn’t always 32-bit clean, which means it can’t be used with Mac OS 7.6 or higher, where 32-bit addressing is employed. Old applications of this kind should be updated or replaced.
- Older software should also be updated for PowerPC-based machines, although these computers do provide 68020 emulation, which can accommodate many 680x0-based applications. Sadly, these models lack the 68030 FPU required by some programs, which means you’ll need extra software such as SoftwareFPU (John M Neil).
Memory Heaps
The Mac’s memory comes in two heaps. The system heap starts at low addresses and automatically works up whilst the application heap starts at the top and works down. All versions of the system later than Mac OS 7.x are designed to prevent these two heaps from colliding.
The first application that you open is put at the top of the application heap and subsequent programs fill the space beneath. The amount of space available is shown in the About this Computer window.
- To get exact memory values in About this Computer, just select Help ➡ Show Balloons and move the pointer to the appropriate application ‘gauge’.
Memory Fragmentation
Each application in a Mac needs an unbroken or contiguous block of memory. If you launch and quit several programs, the memory space is broken up or fragmented. It’s then impossible to launch further applications, even though there appears to be enough memory.
- Fragmentation can be fixed by quitting all recently-launched applications. Unless something’s gone horribly wrong you should be able to leave your very first application running.
- The amount of available contiguous memory appears as Largest Unused Block in the About this Computer window. A special memory utility, such as Memory Mapper (R Fronabarger), can be used to provide more details about how memory is allocated.
- Special extensions sometimes allow you to quit the Finder, which can release further memory without having to select Restart. However, some background applications, including those used to add extra items to the Finder’s menubar may fail to relaunch afterwards.
Memory Problems
When things you wrong you’ll see messages or suffer from odd behaviour, such as the following:-
Message: Not enough memory
- You should close other applications or adjust the memory given to the application.
Message: The application ... has unexpectedly Quit (unknown error)
- Something nasty has happened: select Special ➡ Restart or Shut Down.
Message: Hanging watch, system stopping and starting, colours going grey, font problems
- The system’s in trouble: quickly select Special ➡ Restart or Shut Down.
Messages: Out of memory, Address Error, Bus Error, bombs (25,28,33 or 35), font problems
- The system has run out of memory: select Special ➡ Restart or Shut Down.
- Disk Cache and RAM Disk in the Memory panel also use system memory (see below).
Minimising Memory Failures
To conserve memory and to avoid memory fragmentation and other problems you should:-
- avoid using too many extensions or control panels that contain INIT resources.
- reduce the Disk Cache setting in the Memory control panel (see below).
- turn off AppleTalk if you don’t need it, both in the Chooser and in the AppleTalk control panel. You may have to reselect the printer in the Chooser when you it on again.
- turn File Sharing and Program Linking off in the File Sharing control panel.
- use Special ➡ Shut Down in the Finder to turn the machine off.
As for applications, you should:-
- adjust the memory for each application as described above, if necessary increasing the setting to accommodate very large documents.
- after startup, launch all the important applications first, followed by lesser programs.
- Quit applications after using them, instead of closing windows, but only if you’re really short of memory. You can also press Option when opening a program to make the others quit.
- quickly select Special ➡ Restart or Shut Down if you have to force quit an application using ⌘-Shift-Option-Escape
- flush large items out of the clipboard by copying the same character twice.
 The Memory Control Panel
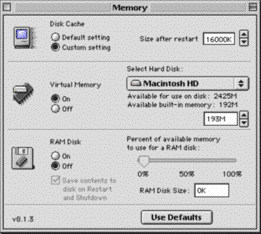
The Memory control panel, illustrated below, determines how the system uses its RAM.
- Changes in settings don’t take effect until you select Special ➡ Restart or Shut Down.
- After zapping the PRAM (see below) the panel may revert to its default settings.
- If you hold down ⌘-Option whilst opening the panel you’ll see an option for enabling or disabling RAM testing at startup. If you turn this off you’ll find that startup is slightly faster. The tests aren’t very important since RAM faults are actually quite rare.
 Disk Cache
A disk cache is a portion of RAM that’s set aside as a software buffer, containing data received from your hard disk drive. It holds recently-used information, thereby speeding up the machine and minimising wear on the drive. The appropriate part of the Memory control panel is shown below:-
You can set the Disk Cache value in 32 K steps, which is convenient since you’re advised to use at least 32 K for every MB of machine RAM, corresponding to 256 K for an old machine with an 8 MB RAM or to around 8160 K for a modern PowerPC-based machine with 192 MB of RAM.
- If in doubt, select Default setting.
- You can try different values to see which uses your memory to best advantage.
- Third-party software or formatting applications may use an intelligent cache. SpotOn disk formatting uses its own cache, so Disk Cache should be set to its minimum, while the Speed Access intelligent cache for Speed Doubler (Connectix) actually uses the Disk Cache value.
 Virtual Memory (VM)
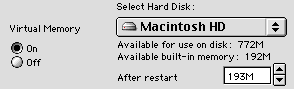
Virtual memory increases the effective memory of your machine by utilising spare hard disk space. It’s normally enabled in Mac OS 7.6 or higher, although it’s very slow on older 680x0-based machines. On PowerPC-based models, VM speeds up application launching and should normally be enabled, unless it upsets any particular software. The appropriate part of the Memory panel is shown below:-
The minimum total memory provided by VM is 1 MB more than the physical RAM. Although it can be increased to as much as four times the RAM, it’s best kept to less than 1.5 times the RAM. VM works by temporarily swapping-out data that’s not wanted in RAM at the present time onto hard disk. The process of swapping-in moves the data back into RAM again.
- When memory is really short the frantic swapping of data between drive and RAM is known as thrashing, which can make the machine horribly slow.
- Best performance is obtained with virtual memory at the minimum, the default setting. For example, if your machine has 192 MB of physical RAM you should set the virtual memory to 193 MB, equal to the RAM capacity plus 1 MB.
- You must set aside enough disk space to use virtual memory. For example, if you have an old Mac with 4 MB of physical RAM and you want to increase this to 6 MB using VM, you must have at least 6 MB of disk space available.
- Before using VM you should update your drive with Drive Setup or HD SC Setup.
You shouldn’t use virtual memory when:-
- running QuickDraw GX under Mac OS 7.x
- using a machine containing a second PowerPC processor and an older Mac OS
- it disrupts older applications used for digital audio recording and playback
With older computers or earlier systems you may prefer to use RAM Doubler (Connectix) instead of VM. However, you mustn’t give each application more memory than the size of physical RAM minus the machine’s system requirements. The version of RAM Doubler that you employ must suit your particular system. In addition, it can’t be used on machines that have a second PowerPC processor.
 32-bit Addressing
Older versions of the Memory panel let you turn 32-bit addressing on or off. This should be enabled if you need more than 8 MB of RAM and if you have 32-bit clean applications.
- In some versions of the system, an application’s ‘cleanliness’ is indicated in its Info window. Failing this, you can use TattleTech (Decision Makers Software Inc), or, as a last resort, you can check the 32 Bit Compatible flag of the application’s SIZE resource using ResEdit.
Modern systems, from Mac OS 7.6 upwards, employ 32-bit addressing, which is theoretically capable of using 4 GB of memory. In practice, the processor has to address other devices, restricting RAM to 1 GB. Older Macs, with 68000 or 68020 processors, use 24-bit addressing, providing a range of 16 MB. This permits only 8 MB of RAM to be used, even when more physical RAM has been fitted.
- Older 68030 models, such as the Mac II, IIx, IIcx, or SE/30, have a ROM that isn’t 32-bit clean, making them unsuitable for later systems, although they do work with Mac OS 7.5.5.
 RAM Disk
A RAM disk is a virtual disk, kept in memory, that acts as a disk drive. The appropriate part of the Memory panel is shown below:-
- It’s possible to use a Macintosh computer without actually using a hard disk drive, but only if you’ve got up to 16 MB or more of RAM to spare as a RAM disk.
- The RAM Disk Size should be set to 416 K or more. A smaller RAM disk will be lost if you update the Mac OS and then restart the computer.
- To use a RAM disk to full advantage it should be set up to contain a minimal system, all necessary applications and the documents you want to work on.
- A RAM disk can be chosen as the startup disk in the Startup Disk control panel.
Setting up and Using a RAM Disk
- Work out how much space you’ll need
- Choose Off under Virtual Memory in the Memory control panel
- Select On under RAM Disk and move the slider to give the required space
- Check that Save on Shut Down is chosen
- Select the RAM disk in the Startup Disk control panel
- Select Special ➡ Restart in the Finder
- Press ⌘-Option-P-R if the machine won’t start
- Drag your hard disk to the Trash and select OK in the dialogue
- Press ⌘-Shift-Ctrl-0 to stop the drive spinning
- Work with your computer as normal
Only a power loss or crash should cause any loss of data
Returning to Normal Operation
- Open the Startup Disk alias on the RAM disk and select your normal drive
- Select Special ➡ Restart in the Finder
- Select the RAM disk and choose Special ➡ Erase Disk
- Choose Off under RAM Disk in the Memory control panel
- Select Special ➡ Restart in the Finder
 Parameter RAM
The Parameter RAM (PRAM) stores 256-bytes of data between startups, and is separate to the normal RAM. It also contains a real-time clock circuit used by the Mac OS, the output of which appears in the menubar clock. A PowerPC-based PCI machine also has a non-volatile RAM (NVRAM).
64 bytes of data are set aside to store parameters for the following control panels, several of which aren’t used in modern versions of the Classic Mac OS:-
AppleTalk, Colour, Date & Time, Desktop Patterns, General Controls, Keyboard, Map, Memory, Mouse, Monitors, Monitors & Sound, Network, Screen, Sound, Startup Disk, Trackpad
- When AppleTalk loses its settings, the Connect via parameter defaults to Printer.
- Settings for the Views control panel, as well as your Trash options, are kept in the Finder Preferences file inside the Preferences folder, within the System Folder.
The PRAM also retains configurations for the Modem port and Printer port, together with your choice of port for a printer. It also contains settings for the Power Manager, which controls the behaviour of the processor and screen. The remaining 192 bytes of PRAM are reserved for manufacture date and other factory settings, although some are used by other software.
 Zapping the PRAM
The PRAM can be reset or zapped by pressing ⌘-Option-P-R during startup. On some machines you may need to hold down the keys until the second startup message appears. This process resets all parameters except the clock. You should only need to do this if:-
- settings in General Controls, Mouse and other panels go wrong
- the desktop pattern reverts to the default
- devices appear to be missing
- the internal hard disk drive loses its icon
- peculiar dates and times appear in the menubar clock
- the speaker volume changes on its own
Some experts claim that you should zap the PRAM at least three times, since all the data isn’t cleared in one go. Better still, use a free utility called TechTool Lite (Micromat Inc).
The following zapping method is recommended by Apple for older PCI-based machines:-
- Select Special ➡ Shut Down in the Finder.
- Ensure that the Caps Lock key isn’t engaged.
- Press the Power key, which is often identified by a
 icon.
icon. - Press ⌘-Option-P-R after the first startup sound.
- After the second startup sound hold down Shift until Extensions Disabled appears in Welcome to Mac OS. If it doesn’t appear, select Restart and hold down Shift until it does.
- Open the Preferences folder and drag Display Preferences to the Trash.
- Select Special ➡ Restart in the Finder.
Having zapped the PRAM some control panel settings will change, although the actual effect varies with hardware and your version of the Mac OS. Typical effects on control panels include:-
- AppleTalk shows AppleTalk enabled
- Colour is set to default number of shades
- Desktop Patterns is set to default pattern
- Memory is set to defaults
- Mouse is set to Slow
- Startup Disk is set to the main internal drive
You can reset these panels to their original settings by hand or by using a file created with TechTool.
- The last 192 bytes of the PRAM, as described above, aren’t cleared by the normal zapping procedure, although they can be cleared by means of TechTool. However, you should only have to deal with this extra area of PRAM if you have persistent problems.
- The PRAM or NVRAM can hold a harmful virus.
©Ray White 2004.