 Mac OS Drawing Mechanisms
Any image that appears on a computer screen or printer is comprised of tiny dots or picture elements, more commonly known as PixElements or pixels, whose varying intensity creates the illusion of a picture. The size of these dots is determined by the resolution of a device, which is usually measured in pixels per inch (ppi) or dots per inch (dpi). Although basically equivalent, the term ppi is normally usually used for monitor screens while dpi is used for printers.
Although a display screen may work at 72 dpi, most printers can generate images at 300 dpi or higher. This discrepancy often causes high-resolution images to appear distorted when viewed on a screen at their normal size, which means you don’t get a true ‘preview’ of the printed result. In fact, you can only see a 300 dpi image clearly if you increase the application’s screen magnification to around 400% or 500%. This makes the pixels in the image align more closely to those on the screen, so minimising any distortion. Lesser magnifications can make a perfectly good image appear faulty.
The software that creates on-screen images is in your computer’s operating system (OS). However, some graphics applications use their own mechanisms, such as PostScript, which means that the images that they produce must be converted into a form understood by the system.
Applications create images in two ways. A bitmap image, also known as a raster image, is produced on a pixel-by-pixel basis, has a fixed resolution and uses considerable memory. On the other hand, a vector graphic, also known as an object-orientated graphic, is efficiently produced using mathematically-generated geometric shapes, requiring very little memory.
Mac OS Drawing MechanismsAll computer platforms use their own software to create on-screen graphics and to generate suitable bitmap images for sending to a printer. The Mac OS uses the following systems:-
This mechanism, used in OS X and also known Enhanced QuickDraw (EQD), is based on Adobe’s Portable Document Format (PDF) technology, itself derived from the PostScript language. Quartz also uses some elements from Apple’s older QuickDraw mechanism (see below).
Early versions of Mac OS X only allow Cocoa applications to use the Quartz drawing mechanism. However, in Mac OS X 10.1.5 and later systems, it’s possible for Carbon applications to also use Quartz, which they can reach from within their own QuickDraw environment.
This software is used for creating on-screen and printed images in the Classic Mac OS.
Enhancements to the Quartz and QuickDraw mechanisms include:-
This is an improved version of QuickDraw, utilising GX fonts for extra printing options and characters. Unfortunately, GX is incompatible with Classic Mac OS 8.x or higher, although some GX applications will work in Mac OS 8.x if you install Apple’s GXGraphics extension. Sadly, GX fonts are incompatible with this extension, whilst printing with some GX applications is impossible.
 QuickDraw 3D
This Classic Mac OS software lets you work with three-dimensional (3D) images in any application that accepts them. However, Apple have now abandoned QuickDraw 3D in favour of OpenGL, which is used in Mac OS 9.x or above and in later versions of Windows.
 QuickTime
This important component forms part of the Mac OS, although it can also be used on the Windows platform, providing support for movies and other files. In the Classic Mac OS it adds:-
 QuickTime VR
This part of the QuickTime package lets you view virtual reality (VR) images from within any application that accepts them. In the Classic Mac OS you can even do this with SimpleText.
QuickTime VR images come in two forms:-
Panorama: usually a 360-degree view of something in the real world
Object Movie: an object that can be rotated in space by clicking and dragging
 Colour Coding
The colour or shade of grey for each pixel in an image is represented as a digital value. The number of bits employed for this purpose limits how many tones can be reproduced. Usually, the number of bits used in any kind of device is known as bit-depth, colour depth or colour resolution.
The following table shows how many bits per pixel are needed for degrees of colour accuracy:-
| Bits | Number | Notes |
|---|---|---|
| 1 | 2 | Monochrome |
| 2 | 4 | Suitable |
| 4 | 16 | Suitable |
| 8 | 256 | Maximum |
| 16 | 65,536 | Thousands |
| 24 | 16,777,216 | Millions |
| 32 | 16,777,216 | Millions |
| 32 | 4,294,967,296 | Billions |
Several different coding methods are used to represent colours, all relying on the mixing of basic tones to create the other shades. Unfortunately, not all colours can be reproduced this way. The range of colours that can be created is demonstrated by a three-dimensional model known as the colour space. When applied to the limitations of a real device this is known as the colour gamut.
The colour space is determined by the coding method. For example, RGB coding (see below) has a bigger colour space than CMYK coding. This, together with the natural imperfections of ink, results in many CMYK printers having a poor gamut, making them unable to reproduce certain hues.
The most common coding methods are:-
A three-colour system, which creates vibrant shades using colour addition, as employed in display screens that use red, green and blue light sources. Modest systems use 8 bits per colour channel, a total of 24 bits, while high-quality software often employ 16-bit channels, a total of 48 bits.
The processes of printing inevitably involves the use of ink, meaning that colours must be produced by a method of colour subtraction. The simplest possible system, known as CMY, is used in low-cost printers and is based on cyan, magenta and yellow inks. Although CMY is good for cool tones and is convenient for colour processing, it has a more limited colour space than RGB coding. Other problems, such as variations in ink colours, further limit the colour gamut. The colour black, supposedly produced by mixing all three inks, usually comes out as a shade of muddy brown.
By using 100% in each colour channel you can obtain the following standard colours:-
| Colour Combination | Result |
|---|---|
| Yellow + Magenta | Red (R) |
| Yellow + Cyan | Green (G) |
| Magenta + Cyan | Blue (B) |
| Y + M + C | Black (K) |
This is similar to CMY coding (see above), but provides a genuine black by means of an extra black channel. This is highly convenient in terms of ink since most printing is actually in black. The extra channel also acts a key (K) for the alignment or registration of other colours. Again, this system provides cool tones and is convenient for processing, but has less colour space than RGB coding.
A six-colour coding system, as used in some printers. The additional light cyan and light magenta inks are designed to fill in the shades that aren’t provided by CMYK, thereby expanding the colour gamut.
A six-channel colour system devised by Pantone, employing CMYK colours (see above), but with the addition of Hexachrome Orange and Hexachrome Green for an expanded colour space.
A system that uses amounts of hue (the basic colour), saturation (the amount of greyness) and value (the lightness or darkness of the colour component) to represent a colour. Hue Saturation Brightness (HSB) and Hue Saturation Lightness (HSL) are variations on the same theme.
Also known as L*a*b* or CIELAB, this international standard was devised by the Commission Internationale de l’Eclairage (CIE), a body that created colormetric models in the 1930s of hue, saturation and luminance. The LAB standard, established in 1976, defines a colour space that accommodates all colours visible to the human eye, independent of any device.
The L* value represents lightness, a* gives the colour as a position on the Red-Green axis of the colour space model and b* is the colour as specified on the Yellow-Blue axis.
 Colour Matching
No two devices, irrespective of resolution or encoding method, produce the same colour tones when you look at the results. For example, a picture that’s fine on one screen, can be too dark on another screen or too garish on a particular kind of printer. This is influenced by the device’s colour gamut, mechanical wear, inks, phosphors and the amazing sensitivity of the human eye to colour.
Consistent colours are made possible by using a colour profile, which defines the gamut for a particular device. A colour management system (CMS), sometimes known as a colour management engine or colour management method (CMM), uses such profiles to modify the presentation of data to each kind of device, using the profile of one device as a reference profile.
Most profiles conform to standards set by the International Colour Consortium (ICC), a body established by Adobe, Agfa, Apple, Microsoft and others in 1993. All CMSs, including the subsets known as ColorSync (see below) and Windows ICM 2, are based on the absolute colours defined by the LAB standard. Hence LAB is often used by applications as a profile connection space (PCS). The ICC standard also allows ICC profile tags to be stored inside a graphics document.
 ColorSync
The Mac OS comes with ColorSync, its own system for matching colours between a screen and printers. It employs the Linotype-Hell colour conversion engine, also known LinoColor.
In the appropriate part of your graphics application you must select a Source Profile that matches a reference device, typically the one device that produces ‘correct’ colours, such as your main monitor or scanner. You must then select a Destination Profile or Output Profile that corresponds to a device used to produce the results, sometimes a monitor but more usually a printer.
You may also need choose from a range of Intents, each of which provides an appropriate mechanism for creating colours outside the gamut of your destination device. Such out-of-gamut colours occur when, for example, a 16-bit image is sent to an 8-bit device.
ColorSync profiles are often generic, meaning that they’re designed to suit all equipment of a particular type. Unfortunately, real devices have considerable variations, sometimes requiring you to make your own profile. To do this you really need special software, as well as an instrument such as a colorimeter or spectrophotometer that can measure the colour output of your device. For example, to create a printer profile you’ll need to print a colour target file, such as the IT8 target, containing 264 colour patches and 24 shades of grey, and then test the colours with the instrument.
 Other Matching Systems
Applications often use alternative matching systems, some of which are supported via ColorSync. One example is the Kodak ICC Colour Management System (KCMS), as used in PageMaker.
There’s also the Adobe Colour Engine (ACE), a more recent colour management system that’s independent of actual devices. Fortunately, Adobe applications also let you use ColorSync.
The Pantone Matching System (PMS) specifies colours exactly by numbers and is widely used by professionals. A swatch chart or fan book gives the colour as RGB, CMYK or HSB numerical values, which you enter into the colour dialogue for your application. In some applications you can select a colour directly using the reference number from a pre-loaded Pantone library.
The Pantone Internet Colour System (PICS) defines the 216 Web-safe colours (of 256) that can be used in GIF files. None of these shades require dither and therefore give clean results on any computer. This standard also specifies the RGB, CMYK and Hexachrome values used in HTML files. Such colours can also be selected in the HTML Picker provided in Mac OS 8.x or higher.
Also known as the Munsell Colour Atlas or Munsell Colour System, this specifies colours in terms of hue, value and chroma.
The ‘colour wheel’ used to specify hue has a total of 100 steps, revolving around the principle hues of R (Red), Y (Yellow), G (Green), B (Blue) and P (Purple), then returning to Red, as well as the intervening or combined hues of YR (Yellow-Red), GY (Green-Yellow), BG (Blue-Green), PB (Purple-Blue) and RP (Red-Purple). The 100 steps are coded as follows:-
| 1 | 2 | 3 | 4 | 5 | |
|---|---|---|---|---|---|
| 1R | 2R | 3R | 4R | 5R | |
| 10 | 1YR | 2YR | 3YR | 4YR | 5YR |
| 20 | 1Y | 2Y | 3Y | 4Y | 5Y |
| 30 | 1GY | 2GY | 3GY | 4GY | 5GY |
| 40 | 1G | 2G | 3G | 4G | 5G |
| 50 | 1BG | 2BG | 3BG | 4BG | 5BG |
| 60 | 1B | 2B | 3B | 4B | 5B |
| 70 | 1PB | 2PB | 3PB | 4PB | 5PB |
| 80 | 1P | 2P | 3P | 4P | 5P |
| 90 | 1RP | 2RP | 3RP | 4RP | 5RP |
| 6 | 7 | 8 | 9 | 10 | |
|---|---|---|---|---|---|
| 6R | 7R | 8R | 9R | 10R | |
| 10 | 6YR | 7YR | 8YR | 9YR | 10YR |
| 20 | 6Y | 7Y | 8Y | 9Y | 10Y |
| 30 | 6GY | 7GY | 8GY | 9GY | 10GY |
| 40 | 6G | 7G | 8G | 9G | 10G |
| 50 | 6BG | 7BG | 8BG | 9BG | 10BG |
| 60 | 6B | 7B | 8B | 9B | 10B |
| 70 | 6PB | 7PB | 8PB | 9PB | 10PB |
| 80 | 6P | 7P | 8P | 9P | 10P |
| 90 | 6RP | 7RP | 8RP | 9RP | 10RP |
The value parameter indicates lightness or darkness, which can be anything between 1 and 10, where 1 corresponds to black and 10 represents white. The chroma or intensity parameter indicates the degree of colour saturation, with 0 representing a grey shade and 15 indicating a pure hue.
The Munsell code of 5Y 8/7 represents a shade of cream, where 5Y is the hue, 8 is the value (7 would be darker) and 7 is the chroma (a very bright colour usually has a value of 10 or 12).
 Digital Colour Meter
Apple’s Digital Colour Meter is a useful Mac OS application that lets you determine RGB and other colour values used within an on-screen image. If you want to copy a colour into another application you can press ⌘-H to hold the current colour and then ⌘-C to copy it.
In an attempt to match your monitor’s colour output, the application uses computer video simulations, although the results don’t an exactly match the Pantone solid colour standards (see above). For more precise matching you must use the current Pantone Colour Reference Manuals.
 Dither and Halftone
Many devices simply don’t have enough bits per pixel to generate all shades. For example, you may have a 24-bit image that has to be reproduced on an 8-bit printer or you may need to print a coloured image on a black and white device. In this situation, an illusion of shading is often created by switching pixels or groups of pixels on or off. This uses one of two techniques, dithering and halftone, both of which are effective, although the true resolution of the image is always reduced.
Similar processing is used in anti-aliasing, where sharp edges in an image are smoothed so as to blend it into the background. This can improve the subjective quality of graphics on a computer monitor that has a limited resolution, although the effect on text can be unpleasant.
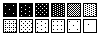
In this process, pixels are turned on and off at varying spacings. The example below shows how monochrome data can be used to create an impression of several shades of grey:-
Most operating systems and applications automatically dither images to improve their appearance on an output device. This is fine with limited resolution devices but can cause unpleasant banding effects.
The most common kinds of dither are:-
As shown in the above picture, this uses a regular patterns of dots. This kind of dither provides reasonable tones, although its obtrusive patterning can appear rather coarse.
A more natural arrangement, in which the dots are closely related to the image contents, giving a less synthetic result. This can take a longer to process than repetitive dither.
The conversion of images from original continuous tones into a halftone is known as screening, and is part of the process of preparing material for screen printing. Traditional halftoning, which originally used an etched glass screen, is similar to dither, with light areas covered by small, widely-spaced spots and dark areas covered by large, closely-spaced spots. High-quality printing of this kind can employ unusual techniques to avoid the creation of Moire patterns, which are produced by printing different spots on top of each other. This includes using of spots of various shapes or printing coloured spots at different angles, such as cyan at 15°, black at 45°, magenta at 75° and yellow at 0°.
Computer-generated halftones are different to traditional printing in that they use evenly spaced spots that vary only in size, the spots themselves being fixed on a larger grid. With a 300 dpi laser printer each spot of this kind (with 16 possible different sizes) is put inside a square of 16 pixels (4 wide by 4 high). By varying the size of the spot it’s possible to represent 16 shades or stepped tones. In this particular example the true resolution of the printer would be reduced by a factor of four.
In a halftone image the actual fineness of reproduction is measured by the number of rows of spots per inch, also known variously as the screen frequency, line screen, frequency of halftone or dot density. This is usually measured in lines per inch (lpi).
For our 300 dpi printer using a 4 by 4 pixel square the screen frequency (SF) is given by:-
The number of grey level shades provided by halftoning is given by:-
Where PR is the printer resolution. Hence a 133 lpi image reproduced on a 1200 dpi imagesetter would have around 82 shades. The highest number of shades that can be represented is 256, the maximum accommodated by a PostScript Level 2 printer, and, according to Adobe, the maximum number that the human eye can discern. In practice, most printing processes use 100 shades or less. From the above equation you can deduce that you should never exceed the screen frequency given by the following equation:-
or, putting it another way:-
The following table provides some practical values:-
| Res | Square | SF (lpi) | Shades |
|---|---|---|---|
| 300 | 4 | 75 | 16 |
| 300 | 5 | 60 | 25 |
| 600 | 10 | 60 | 100 |
| 1200 | 9 | 133 | 82 |
In reality, the number of perceptible shades is often less than half the number shown.
Halftone images must be prepared to match the printer or paper that will eventually be used. Typically, a screen frequency of 53 or 60 lpi should be used for a 300 dpi printer, 100 lpi for a 600 dpi machine or 133 lpi for high-quality. Coarser screens are often used for poorer paper, such as newsprint, where the ink bleeds across the paper, an effect known as dot gain.
When creating or scanning an image for screen printing you should use a resolution set by:-
where the N is a value somewhere between 1.5 and 2.5, the resolution is in measured in dpi and the screen frequency is in lpi. Here are some practical examples:-
| SF (lpi) | Quality | Res (dpi) |
|---|---|---|
| 50 | 300 dpi laser | 100 |
| 130 | Newsprint | 260 |
| 150 | Magazine | 300 |
And remember, scanning at a higher resolution than shown in this table won’t actually give any improvement in the final result: it simply wastes information, giving you an excessively large file. In most instances, scanning at over 300 dpi is unnecessary for images that are printed in halftone.
Supposing your final work is to be at 100 lpi then:-
If the final image is to be scaled down by 80% you can reduce the resolution to:-
 The PostScript Language
Older graphics and desktop publishing (DTP) applications often use PostScript files to describe vector images and other content. To see the construction of the PostScript language you can open a PostScript file using a standard text editor. Here’s an example of a simple document:-
%!PS-Adobe-3.0
/drawbox
{
0 0 moveto
100 0 lineto
100 100 lineto
0 100 lineto
closepath stroke
}
def
250 350 translate
drawbox
15 rotate
drawbox
15 rotate
drawbox
45 rotate
drawbox
showpage
This creates four boxes, the second two shifted by 15° and the third by 45°, as illustrated below:-

The key codes within this document are as follows:-
| Code | Meaning |
|---|---|
| % | Start |
| / | Precedes |
| { | Start |
| } | End |
| def | End |
| translate | Tells |
| rotate | Rotates |
| showpage | Tells |
Here’s another example, this time generating text in 3D form with a shadow, as produced by the sun at 4 o’clock in the afternoon. The size of the text is set to 36-point by the line /pointsize 36 def while the text itself is contained in the line /text (The Text is Here) def.
%!PS-Adobe-3.0
/inch {72 mul} def
/pica {12 mul} def
0 792 translate
/font /Helvetica-Bold def
/pointsize 36 def
/top 72 neg def
/left 72 def
/text (The Text is Here) def
left top translate
font findfont pointsize
gsave
[1 0 1 1 0 0] concat .8
0 0 moveto text show
grestore
0 0 moveto text show
showpage
The result looks something like this:-

A PostScript file that’s converted into an EPSF is a very different document. Our first PostScript example, when converted into an EPSF using GhostScript, begins like this:-
%!PS-Adobe-3.0 EPSF-3.0
%%Creator: Aladdin
%%CreationDate: 2002/04/09
%%DocumentData: Clean7Bit
%%LanguageLevel: 2
%%EndComments
%%BeginProlog
and finshes with:-
%%EndProlog
%%Page: 1 1
%%BeginPageSetup
save GS_pswrite_ProcSet
%%EndPageSetup
1 w
0 g
0 0 m
612 0 l
612 792 l
0 792 l
Y
200 600 100 100 re
S
200 600 m
296.593 625.882 l
270.711 722.474 l
174.118 696.593 l
h
S
200 600 m
286.602 650 l
236.602 736.602 l
150 686.602 l
h
S
200 600 m
225.882 696.593 l
129.289 722.474 l
103.407 625.882 l
h
S
end showpage restore
%%PageTrailer
which is a bit more complicated than the original, none of which can be seen.
Jamal Ghandour, ATPM, 1999
©Ray White 2004.
